Cascade Picklists with Workspace Rules

My requirement was to create in a Custom Object two picklist fields, one of them being dependent of the other i.e. I needed to restrict the values of Menu2, based on the value selected in Menu1.

First step is to create two Menu-Only custom objects:

  • Go to Database Object Designer open package CO
  • Click New on the ribbon and chose Menu Only Object
  • Give a name to the Menu-Only Custom Objects and add the values (values can be then added/updated through the Customizable Menus)

I created CO.Menu1, with values “Language” and “Employment Status”
I created CO.Menu2, with values “English”, “French”, “German”, “Part Time”, “Full Time”, “Unemployed”.

Second step is to create two fields, type Menu in my Custom Object:

  • Select your Custom Object and choose the Fields tab (on the ribbon)
  • Click Add New Field button and choose Menu type
  • Give a Name to the field
  • Choose CO.Menu1 (or CO.Menu2) from the Menu Field Settings

After all these changes on the Object Designer, save and deploy (buttons on the ribbon).

Third step is to add the two fields to the workspace:

  • Go to Application Appearance Workspaces and open your workspace
  • Click the Insert Field tab on the ribbon and drag the two new fields to the workspace

Fourth step is to create the Rules:

  • Click the Rules tab on the ribbon and click Add Rules
  • Create the following two rules:

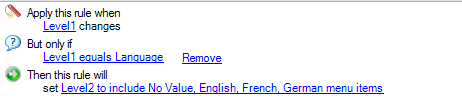
If Menu1 = “Language” then set Menu2 to include “No Vale”, “English”, “French”, “German”
– Trigger = Apply this rule when a field changes (field “Menu1”)
– Condition = But only if a field as a certain value (Menu1 equals “Language”)
– Then = Set menu field to include menu items (Menu2 to include “No Vale”, “English”, “French”, “German”)

rule1

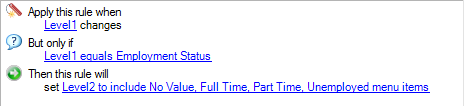
If Menu1 = “Employment Status” then set Menu2 to include “No Value”, “Part Time”, “Full Time”, “Unemployed”
– Trigger = Apply this rule when a field changes (field “Menu1”)
– Condition = But only if a field as a certain value (Menu 1 equals “Employment Status”)
– Then = Set menu field to include menu items (Menu2 to include “No Value”, “Part Time”, “Full Time”, “Unemployed”)

rule2

Custom Fields – Input Masks

Input masks are defined patterns that determine the format of information that can be typed in a text field.

Input masks are useful for preventing data entry errors when a text field has a specific input format that must be followed (for example, a phone number that must include parentheses and a hyphen, or an email that must include a @ and a ‘.’).

To define a mask pattern, two characters are required to represent one character or digit in a masked text field:

  • The first character does not display in the masked text field, but acts as a rule to define the acceptable input format.
  • The second character displays in the masked text field and acts as an input hint for staff members and customers.

The following table describes the first and second characters that define mask patterns:

im1

In a masked text field, the # symbol signifies a numeric character and the @ symbol signifies an alphabetic or non-numeric character. Formatting characters, such as spaces, hyphens, and parentheses, are static so staff members and customers cannot replace them with other characters

im2

Important Note: When the field is added to the workspace, the mask will appear to help the used fulfil the value. It will not let the user input numbers when letters are required or vice versa. The formatting characters will be fixed and cannot be removed, and the upper/lower case letters are entered even if the user does not ise caps lock or shift keys.

im3

When the field is exposed to the Customer Portal, the mask will appear below the field as an expected input.

hint_true

If you don’t want the mask to appear in the Customer Portal, you just have to edit the page and change the PHP code as follows:

<rn:widget path=”input/CustomAllInput” table=”incidents” always_show_mask=”false”/>

hint_false

Custom Fields

Custom Fields are created in the knowledge base to allow the collection of business-specific information, to best meet the organization’s needs.

After being created, custom fields can be added to workspaces and scripts, be used as search filters in reports, or as audience filters in RightNow Marketing and RightNow Feedback.

When creating a custom field, Admins can specify whether it is visible and editable on the Agent Desktop and, for some custom fields, visible and available to gather details on the Customer Portal.

Admins can also specify a data type for the field, choose whether the field is required or not, and set a default value.

Text field data types allow you to create an input mask to require that information entered in the field matches a defined format.

When Admins add or edit custom fields, those modifications may be completed in real time or scheduled and performed in the background.

cf1

Custom field visibility

When adding custom fields, there are several visibility options. The visibility options define where and how custom fields are presented on the Agent Desktop and the Customer Portal. For example, you can make a contact custom field visible to staff members when adding an incident, but restrict their ability to edit it.

Custom fields with end-user visibility are displayed on the Customer Portal. If you display a custom field that is not editable by customers, it does not appear on the Ask a Question page. There are other ways to determine visibility on the Customer Portal, such as widgets and page code.

Answer, incident, contact, opportunity, organization, sales quotes, and tasks custom fields must also be added to the appropriate record’s workspace.

The Admin Edit visibility setting must be selected in order for a custom field to be available to add to workspaces and scripts. Once a custom field is added to a workspace or script, its visibility, read-only, and required attributes are determined by the properties set in the workspace or script.

cf2