The 18B release of Oracle Service Cloud (OSvC) is now generally available and it brings some very interesting new features and enhancements. I will break them down in separate posts. This is the first post.
Chat – Virtual Assistant
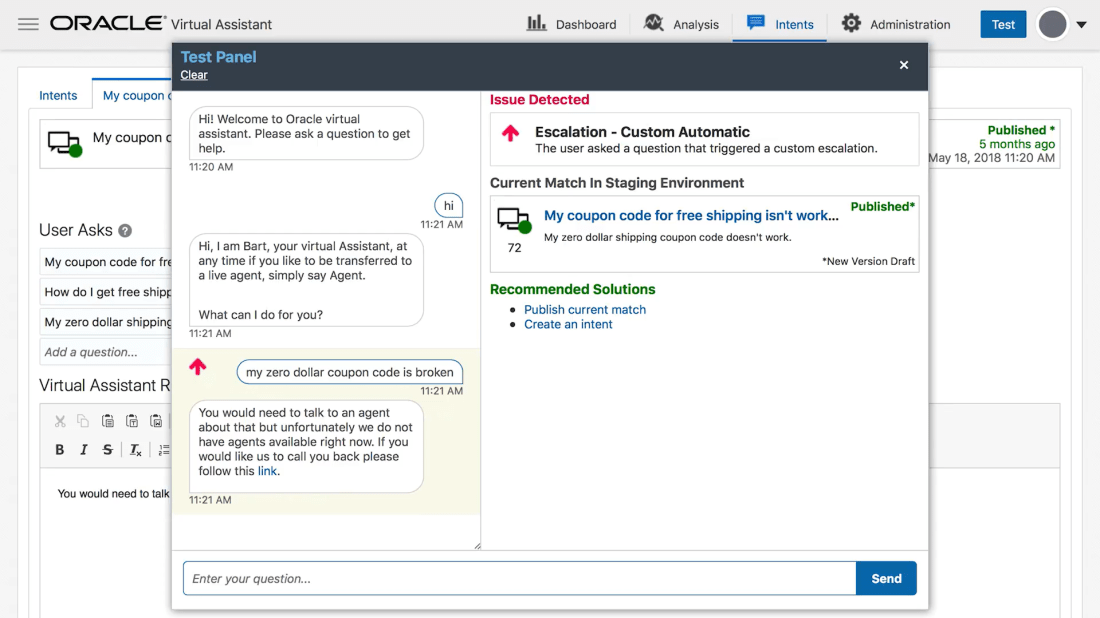
One of those exciting enhancements is the launch of the Virtual Assistant (VA). Some of you may be asking “wasn’t the Virtual Assistant launched 5 years ago?“. Yes, back in Nov 2013 Oracle announced the VA which, at the time, was based on a separate product called Intent Guide and forced users to use a different application (login and user interface) to configure it.
The 18B release brings a much more integrated, seamless and powerful VA capability, which can be accessed, configured and fine tuned by OSvC administrators, using a VA editor in the OSvC interface. Nonetheless, it is still based on the aforementioned Oracle RightNow Intent Guide Cloud Service (find here the admin user guide).
This enhanced VA will hopefully be a step in the right direction and allow companies to not only decrease the volume of chat sessions that require an agent, but also improve the customer experience.
Simple questions with straightforward answers – aka high volume/low value queries – should be picked up and answered by the VA, using the information in the knowledge base. Making service more efficient and effective.
The new (or enhanced) OSvC VA allows you to configure escalation rules, that will route the chat session to the right queue and agent, when the VA cannot answer, as well as pass the conversation thread to the agent, for context.
Additionally it allows you to test scenarios and provides real-time dashboard so you can monitor performance and questions being asked, as well as identify new content that can be added to the VA and knowledgebase.
In order do use the VA you should ask Oracle (your account manager) to enable it and then perform the following steps:
Assign the Virtual Assistant Edit permission to your profile (you will find this permission in Profile > Permissions > Administration tab)
Add the Virtual Assistant editor to a navigation set (you will find this in Navigation Sets > Configuration > Components > Common)
Create the VA profile and account (to define the VA name that will display to customers e.g. “Siri”), as well as the VA chat queue (which will handle incoming chats and escalation)
Create chat rules to route virtual assistant chats and escalate virtual assistant chats to agents when necessary.
Note: You can have only one VA account and one VA queue. The VA profile, account, and queue cannot be deleted. However, account and queue names can be changed.
The RightNow Intent Guide uses natural language searching to return results that guide customers directly to the information they need. Using best-in-class semantic search technology combined with industry-specific linguistic dictionaries and advanced algorithms, your customers’ questions are matched to the most relevant content to deliver the right answers immediately.
The CombinedSearchResults widget used with Intent Guide can return not only the search results from natural language searching, but also answers from your knowledge base and posts from RightNow Community.
Intent Guide searches do not support the use of wildcards. As a result, although wildcard searching may return results from the knowledge base and community posts, it will not return Intent Guide search results unless the wildcard character is part of the answer.
Configuring Intent Guide
Before you begin editing customer portal pages for Intent Guide, you’ll first need to define Intent Guide configuration settings.
1. Log in to RightNow CX
2. Click the Configuration button on the navigation pane
3. Double-click Configuration Settings under Site Configuration
4. Click RightNow Common
5. Click INTENT_GUIDE_ENABLED under RightNow Intent Guide > General
6. Select the Yes radio button, click Update, and then click Commit and Exit
(Click to enlarge)
Important: Additional setup is required to implement Intent Guide on your site. Contact your Oracle RightNow account manager to schedule this work.
7. To change the URL of the page that displays an Intent Guide answer from the default answers/intent, change the value of CP_INTENT_GUIDE_URL.
a. Click RightNow User Interface
b. Select CP_INTENT_GUIDE_URL under Customer Portal > Pages
c. Type the page name in the Value field
d. Click Update
8. Click Commit and Exit
(Click to enlarge)
Overview of Intent Guide on the customer portal
By default, Intent Guide is not configured as part of the customer portal reference implementation. However, a default intent.php file is included in the standard and mobile page sets to display individual Intent Guide answers that appear in the search results. Two widgets – IntentGuideDisplay and CombinedSearchResults – are also included among the standard widgets.
Note: If your Oracle RightNow account manager has implemented Intent Guide on your site and you have configured the site, you can modify the customer portal pages to take advantage of the feature.
Intent Guide search results may link to absolute URLs as well as answers in your knowledge base. Duplicate answers returned in both the knowledge base results and Intent Guide results are removed from the knowledge base results.
Note: When answers created on the Intent Guide site reference answers in the RightNow CX knowledge base, duplicate answers are removed only when the RightNow CX answers are referenced by their answer IDs. If the Intent Guide answers use URLs to reference RightNow CX answers, the customer portal page will display duplicate search results.
Note: Knowledge base answers displayed in the Intent Guide results section of the page are not checked for status, so all relevant answers are displayed with a link. If customers click a link for a private answer in the Intent Guide search results, they will not be able to view the answer. Answer IDs are not validated, so Intent Guide results that point to invalid answers in the RightNow CX knowledge base will still appear as links on the page.
Answer types that are not supported in Intent Guide include SQL, XML, action, JavaScript, and local URL. These answers will be stripped from the result set before being displayed.
To use Intent Guide, you’ll edit the Answers page (or the answers list page on the mobile implementation) to display Intent Guide search results. Instead of displaying individual answers on the answers/detail page, the customer portal displays them on the answers/intent page that is called when Intent Guide is used.
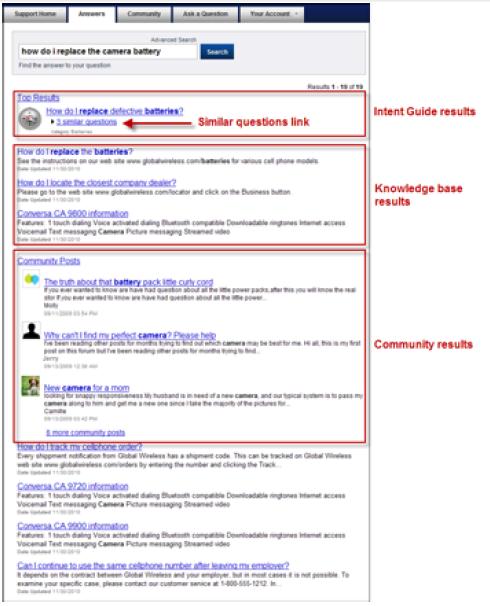
When Intent Guide is enabled and the standard Answers page is edited, the search results are displayed by the CombinedSearchResults widget and resemble the following figure.
The Intent Guide results may display a Similar Questions link. When customers click the link, a screen similar to the following figure appears.
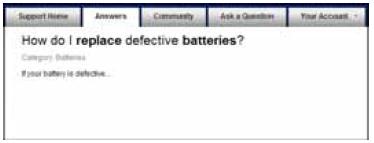
Selecting an individual answer results in a display that resembles the following figure. This answer is displayed using the IntentGuideDisplay widget on the answers/intent.php page.
Adding Intent Guide functionality to standard pages
The following steps provide an overview of customer portal changes required to use Intent Guide
Step 1: Remove the AdvancedSearchDialog from the Support Home page. Since the search results from Intent Guide and the Community cannot use advanced search filters, we recommend removing them from the page to avoid confusion for your customers. The search field now appears without the Advanced Search link.
1. Open the home.php file in the /views/pages folder.
2. Delete the following line of code:
Step 3: Edit the Answers page to remove the AdvancedSearchDialog widget as you did on the Support Home page. Then you’ll replace the Multiline2 report widget, which displays standard search results, with the CombinedSearchResults widget, which displays results from Intent Guide, the knowledge base, and community posts. You’ll add an attribute to the ResultInfo2 attribute to display results from the combined search.
To edit the Answers page for Intent Guide:
1. Open the list.php file in the /views/pages/answers folder.
2. Delete the following line of code:
4. Replace the code you located in step 3 with the following:
<rn:widget path=”search/CombinedSearchResults”/>
5. To prevent the display of one or more types of results, perform one or more of the following actions.
a. To prevent the display of knowledge base answers, click here.
b. To prevent the display of Intent Guide results, add intent_guide_results=”0″ to the code you added in step 4.
c. To prevent the display of community posts, add social_results=”0″ to the code you added in step 4.
7. Add the combined_results attribute to the ResultInfo2 code you located in step 6. If you want to display all the search results, set the attribute value to “all” as in the following code.
6. Add the display_knowledgebase_results attribute to the ResultInfo2 widget as you did to the CombinedSearchResults. Also add the label_results attribute to the code to change the Results label. (The default value is similar to “Results 1 – 10 of 45,” while this edited version displays “Results 1 – 10.”)