Email Management: Service Process

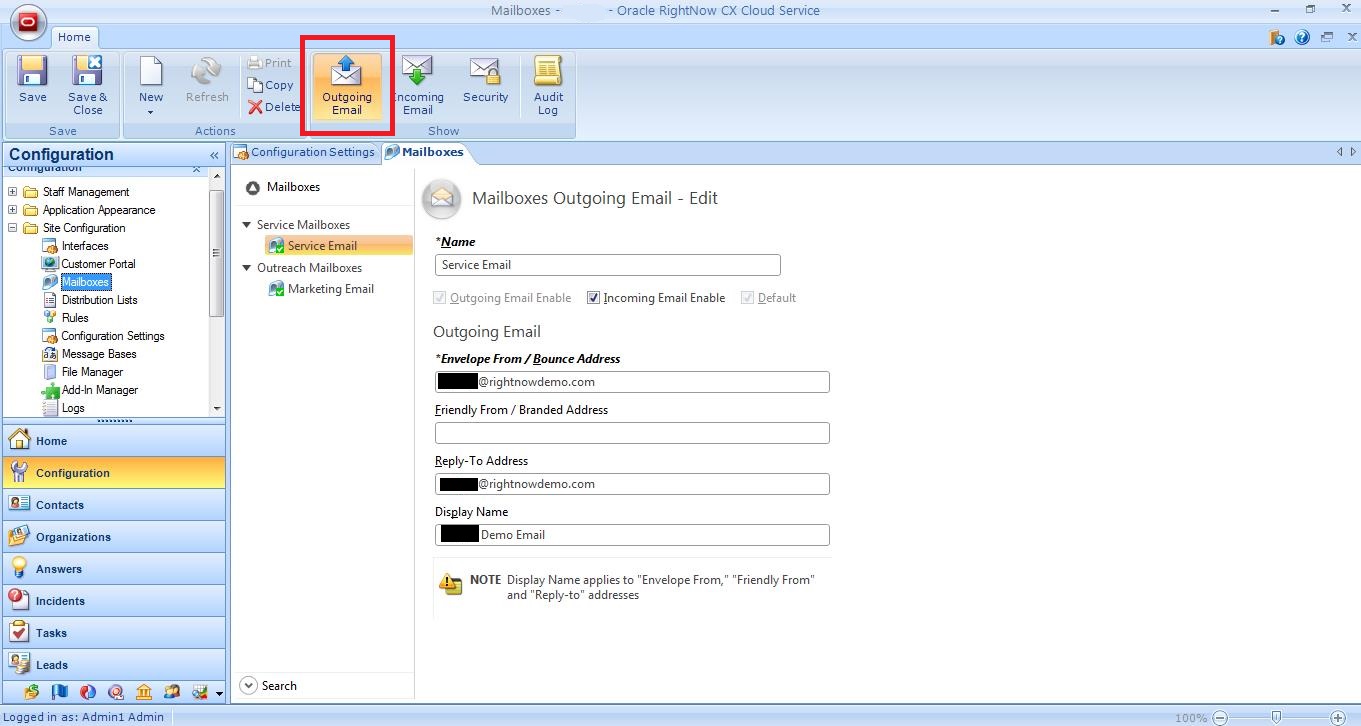
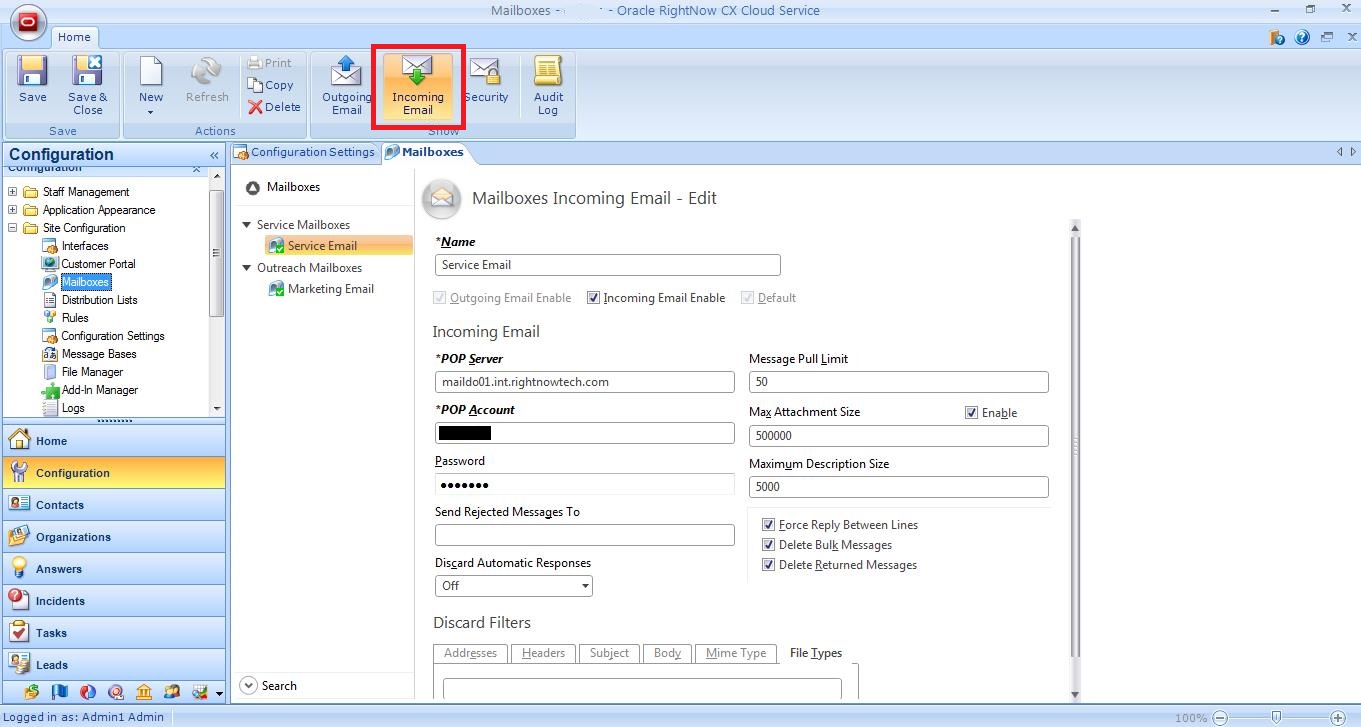
The Email Management feature in RightNow CX gives complete control over the handling of inbound and outbound email messages, whether they are related to Service (incidents or staff notifications), Outreach (surveys) or Marketing (mailings) matters.

When it comes to Service, RightNow CX handles email communication between customers and the customer service team in a very flexible way. RightNow CX evaluates each incoming email to ensure it meets the criteria for service, and then manages all back and forth email replies between the agent and contact until the incident is resolved. Along the way, RightNow CX can automate key service email messages that will help the customer service team to deliver timely, world-class service.

When a customer emails a question to the customer service email account, RightNow Service handles it using the following process:

1. A contact record is associated: The Techmail (*) utility first searches all contact records for the email address in the Reply To field of the message’s mail header. If no match is found, Techmail looks for the address in the mail header’s From field. If a match is found, the contact record is associated with the incoming request. If the customer’s email address is not found in an existing contact record, a new contact record is created for the customer.

2. Contact validity is verified: Once the email management system identifies a matching contact record, customer information is evaluated to determine whether it meets your organization’s requirements for service. If SLA’s are required, the system checks to ensure the customer has a valid SLA before creating an incident. If the customer does not have a valid SLA, an auto-response denying assistance is generated and sent to the customer.

3. An incident is created: Once a contact record is matched and any SLA requirements are met, Techmail creates an incident using the contents of the email message. If the message is multipart (containing both HTML and text versions), the text version of the message is added to the incident thread and the HTML version is discarded. If the message contains HTML only, it is converted to text and added to the thread.

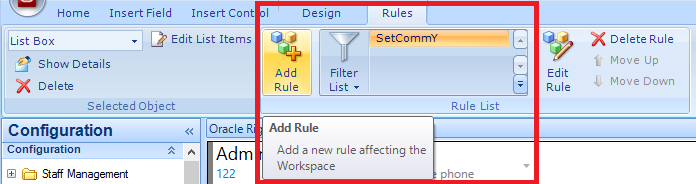
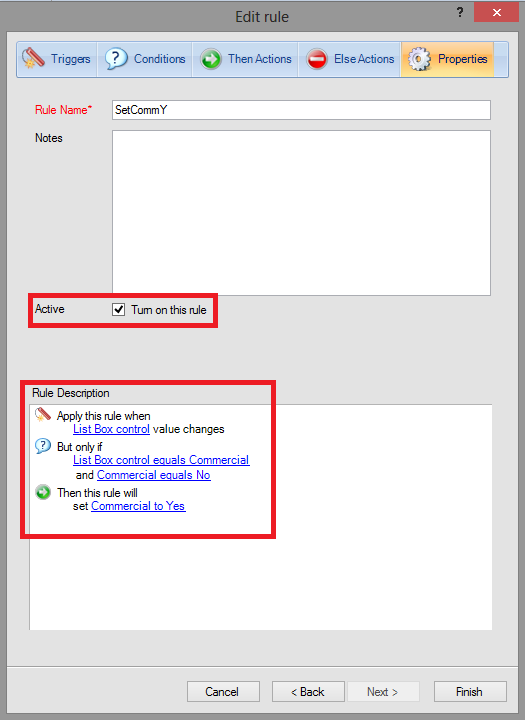
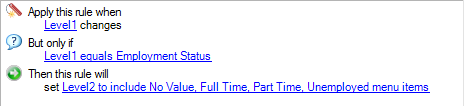
4. The incident is processed by business rules: Upon incident creation, RightNow CX sends the contact an auto-generated receipt for the question. However, business rules are often configured to perform additional functions such as assigning an SLA, sending an auto-response, and assigning the incident to an agent for a response. Rules can also be configured to escalate the incident if the assigned agent does not answer the customer’s question within a specified time period.

5. The agent responds: When an agent responds to the contact’s question, an email is sent to the contact containing the agent response. Occasionally, a contact may reply with additional questions or information for the agent. Techmail identifies the reply message by looking for specific markers (such as the contact email address, the reference number in the subject line, and the message tracking string in the mail header) and applies the update to the incident, extending the conversation until resolved.

* Techmail: A scheduled utility that retrieves mail from specified POP3 mailboxes. RightNow Service processes some of the mail into new incidents and routes the incidents using business rules (depending on settings). RightNow Marketing and RightNow Feedback process bounced messages to assist in tracking incorrect email addresses.

Email Management: Service email reply processing

With RightNow CX customers have the ability to update incidents by replying to email messages. The management of this process is sometimes tricky as customers include the original message in their reply, quoting the email they received from RightNow CX.

When the Techmail (*) detects an email reply, it attempts to identify the part of the message containing the customer’s reply, and strips out any text that may have been quoted back from the original message thread. In this way, new replies are added to the incident as a new entry in the incident thread, while text from previous thread entries is ignored.

Techmail uses several methods to determine which blocks of text in a message consist of previous thread entries:

  • Most email clients mark or “block quote” the original message when replying. In text messages, the original text is often block quoted by inserting a greater than symbol (>) or a vertical bar (|) at the beginning of each line of the original text. In HTML messages, the original message is usually enclosed in block quote HTML tags (<blockquote>). Parameters in the block quote HTML tag indicate how the message should be displayed (for example, each line begins with a vertical bar or an indent). The Techmail utility’s block-quoted reply detection method finds block-quoted text and removes it from the email, leaving only the reply from the customer.
  • If a customer replies to multiple points within the original email, inter mixing the reply with the original text, the message may contain multiple blocks of quoted text. In this case, the replies may refer to the original text above them, which may be important, so Techmail includes the entire email message in the incident.
  • If a customer replies within the original text, and the reply text begins with a block quote, such that the reply is indistinguishable from the original text, Techmail can determine that additional text has been added within the original text by comparing checksums in the reply to checksums in the original message. If the checksums differ, the entire email is added to the incident to ensure that no reply text is lost.
  • Techmail can also detect and remove “boilerplate” messaging while leaving the customer’s content intact. Boilerplate messaging is text that has been added to an email message by a mail client, such as a line of advertising text embedded by Hotmail. This helps to ensure that the thread is not diluted with advertising and contains only information pertinent to the discussion.

* Techmail: A scheduled utility that retrieves mail from specified POP3 mailboxes. RightNow Service processes some of the mail into new incidents and routes the incidents using business rules (depending on settings). RightNow Marketing and RightNow Feedback process bounced messages to assist in tracking incorrect email addresses.

Email Management: Mailboxes

There are two mailbox types in RightNow CX:

  • Service
  • Marketing

Service mailboxes are used only with the RightNow Service application, while Marketing mailboxes are used with either RightNow Marketing or RightNow Feedback.

Mailboxes are used to define outgoing email settings and to specify the email accounts to pull email messages from. You cannot send or receive email from an application until at least one mailbox is configured and enabled for your RightNow CX interface.

Service and Marketing mailboxes cannot be share in order to ensure accurate processing of replies, inbound messages, and bounces. Techmail (*) handles messages in the Service mailbox differently from how it handles them in the Marketing mailbox.

Mailboxes can be configured to handle only outgoing email, only incoming email, or both.

  • Outgoing email settings define the identifying information to be included in outgoing email sent by the mailbox, such as the Envelope From/Bounce Address, Friendly From/Branded Address, Reply-To Address, and Display Name.

em1

  • Incoming email settings define the POP server, POP account, and password used to access incoming email. Other incoming settings provide methods to filter mail messages (by applying discard filters and restricting file attachments by size and file type) and forward rejected messages to another email address.

em2

To safeguard your email communication, RightNow CX supports SSL and S/MIME security methods along with the ability to manage certificates and authentication options. Together, these features can provide a high level of security for messages traversing the Internet between you and your customers.

em3

* Techmail: A scheduled utility that retrieves mail from specified POP3 mailboxes. RightNow Service processes some of the mail into new incidents and routes the incidents using business rules (depending on settings). RightNow Marketing and RightNow Feedback process bounced messages to assist in tracking incorrect email addresses.

RightNow Mobile Agent app

In the 2013 releases Oracle introduced the Mobile Agent app for RightNow CX – Oracle Tap Service and Support. A native iPad app that allows users to deal with the daily issues when they’re away form their desks.

A field agent can access critical information (e.g. contact location or phone), find incidents and update them while onsite. A specialist agent can find, reply and update incidents wherever or reassign them. A Manager can monitor every incident and have an overview of what’s going on.

The Mobile Agent app let’s users:

  • View, filter, search and update Incidents
  • View, filter and search Contacts
  • View, filter and search Organisations
  • View, filter and search Staff
  • Navigate between objects

And this can all be done offline and then synchronized.

As an image is worth a thousand words, I will leave you a video with a small demo:

Oracle Tap Service and Support from Hernan Capdevila on Vimeo.

Multi-Select Check Box

My requirement was to create a multi-select check box custom field – in the “Organisations” object – where the user could tick or un-tick many options. Pretty much like the out-of-the-box field “State” in the “Organisations” object shown in the image below. Unfortunately it is not possible to create a multi-select check box like this within the database.

cb1

My workaround was the following:

Step 1: Create a “Yes/No” type Custom Field with “Default Value = No” for each of the options.

Click the “Configuration” button in the Navigation Pane > Double-click “Custom Fields” under “Database” in the Navigation List > Select “Organization” object and click “New” on the ribbon.

cb2

Step 2: Add a new tab to the “Organisation” workspace, make it hidden, and drag/drop the Custom Fields into it.

Double-click “Workspaces” under “Application Appearance” in the Navigation List > Select and Open the Workspace > RightClick a tab in the tab set and chose “Add Tab After (Before)” > Select the new tab, go to the “Design” tab “Behavior” section on the ribbon, click “Hidden” and select “On New” and “On Open” > Select the “Insert Field” tab on the ribbon and drag/drop the fields to the workspace.

cb3

Step 3: Insert a List Box control on the workspace, for each of the options.

Create a new section (with “Title Bar” and “Spacer” controls) on your workspace > Go to the “Insert Control” tab “Controls” section in the ribbon and drag/drop List Boxes into the workspace.

cb4

Step 4: Set the “Allow Multiple Selections” in each of the List Boxes and Edit the name according to the options.

Select each List Box, go to “Design” tab “Options” section on the ribbon > Set “Allow Multiple Selections” > Edit the name of the item in the List Box on the “List Box Items” section.

cb5

The fields in the workspace will look like the following image:

cb6

Step 5: Add a workspace rule to each of the List Boxes

Select the List Box, go to the “Rules” tab “Rule List” section on the ribbon and click “Add Rule”

cb7

Step 6: Create a rule to set the Custom Field after List Box item is ticked

Trigger: An input control value is changes (select the desired List Box)
Condition: An input control has a certain value (select the desired value for the List Box Item)
Condition: A field has a certain value (select the desired value “N” for the related Custom Field)
Then Action: Set the value of a field (set the desired value “Y” for the related Custom Field)

cb8

Step 7: Add a workspace rule to the workspace for when the editor loads

Go to the “Home” tab “Workspace Properties” section on the ribbon and Click “Rules”

cb9

Step 8: Create rules (as many as List Boxes) to tick the List Box items when the editor loads

Trigger: The editor loads
Condition: A field has a certain value (select the desired value “Y” for the related Custom Field)
Then Action: Set the value of an input control (select the desired value “Y” for the List Box Item)

cb10

When this is finished, you should be able to create an Organisation record, select the check boxes you want, save the record. When you come back and open that same Organisation record the check boxes will be ticked as you selected them previously.

Note: Before choosing to create a List Box for each of the options, I tried to do it with only one List Box with many items (one for each of my options). It didn’t work because I realised that workspace rules with the same trigger will work (one after the other, by the order in the list) if the action regards different fields or controls, but not if rules try to set the same control.

Thank you to Mark Kehoe (Independent Oracle RightNow Consultant) for his help on this requirement.

Calculated field using JavaScript API

I have created a “Date of Birth” Custom Field (Type: Date) on the Contact object, and my requirement was to create a field that would display the Age of the Contact, based on the “Date of Birth” field.

For that I used the Connect Desktop Integration (JavaScript API), and did the following:

  • Step 1: Create a Custom Field (Type: Integer) in the Contact object with the name “Age”, and add the field to the Contact workspace.

img1

  • Step 2: Create an HTML file with code to calculate the Age and set the “Age” field.

<html>
<head>
<script type=“text/javascript”>
function SetAge()
{
var dobInt = window.external.Contact.GetCustomFieldByName(“c$date_of_birth”);
if (dobInt == –1)
{
var textna = “N/A”;
window.external.Contact.SetCustomFieldByName(“c$age”, textna);
return;
}
var dob = new Date(dobInt * 1000);
var now = new Date();
var yearAge = now.getFullYear() – dob.getFullYear();
var monthNow = now.getMonth() + 1;
var monthDob = dob.getMonth() + 1;
if (monthNow < monthDob || (monthNow == monthDob && now.getDate() < dob.getDate()))
yearAge–;
window.external.Contact.SetCustomFieldByName(“c$age”, yearAge);
}
function ondataupdated(obj)
{
SetAge();
}
</script>
</head>
<body onload=SetAge()>
</body>
</html>

  • Step 3: Upload the HTML file to a server via FTP and take the URL.
  • Step 4: Add a new tab to the Contact Workspace and drag and drop a browser control into the tab

img2

  • Step 5: Select the browser control, go to the Design tab > Options section, and put the URL of the HTML file into the URL field.

img3

  • Step 6: Select the new tab, go to the Design tab > Behavior section, click the Hidden button and make the tab hidden “On New” and “On Open.

img4

  • Step 7: Select the browser control, go to the Design tab > Options section, and un-check the Delay Page Load check box.

img5

Now, whenever you open a contact that has “Date of Birth” populated, the script will calculate the Age and set the “Age” Custom Field with the right value.

img6

You might also want to make the “Age” field read only so that its value is only set by the script and not by the user.

Important Note: The date fields only allow to go back to 1970, which in this case of Date of Birth is a bit limited.

Thank you to Jens Lundell (Oracle RightNow Workflow Development Manager) for his help on this requirement and to Mark Kehoe (Independent Oracle RightNow Consultant) for raising the date limitation issue.

Change Tab Set size

Sometimes the Summary area in the Workspace is too short for all the fields that we have to display, and we don’t want users to be forced to scroll down. Therefore we need to make the Tab Set shorter in order to have more room for the summary.

tabset

To make the Tab Set shorter you have to do the following:

  • Select the Tab Set (not just one of the tabs) with the mouse or by going to the Design tab and select “Tab Set” in the Selected Object picklist.
  • In the tab Design notice the Options section and click Summary Panel Height.
  • Adjust the the Tab Set by choosing the height.

tabset1

Cascade Picklists with Workspace Rules

My requirement was to create in a Custom Object two picklist fields, one of them being dependent of the other i.e. I needed to restrict the values of Menu2, based on the value selected in Menu1.

First step is to create two Menu-Only custom objects:

  • Go to Database Object Designer open package CO
  • Click New on the ribbon and chose Menu Only Object
  • Give a name to the Menu-Only Custom Objects and add the values (values can be then added/updated through the Customizable Menus)

I created CO.Menu1, with values “Language” and “Employment Status”
I created CO.Menu2, with values “English”, “French”, “German”, “Part Time”, “Full Time”, “Unemployed”.

Second step is to create two fields, type Menu in my Custom Object:

  • Select your Custom Object and choose the Fields tab (on the ribbon)
  • Click Add New Field button and choose Menu type
  • Give a Name to the field
  • Choose CO.Menu1 (or CO.Menu2) from the Menu Field Settings

After all these changes on the Object Designer, save and deploy (buttons on the ribbon).

Third step is to add the two fields to the workspace:

  • Go to Application Appearance Workspaces and open your workspace
  • Click the Insert Field tab on the ribbon and drag the two new fields to the workspace

Fourth step is to create the Rules:

  • Click the Rules tab on the ribbon and click Add Rules
  • Create the following two rules:

If Menu1 = “Language” then set Menu2 to include “No Vale”, “English”, “French”, “German”
– Trigger = Apply this rule when a field changes (field “Menu1”)
– Condition = But only if a field as a certain value (Menu1 equals “Language”)
– Then = Set menu field to include menu items (Menu2 to include “No Vale”, “English”, “French”, “German”)

rule1

If Menu1 = “Employment Status” then set Menu2 to include “No Value”, “Part Time”, “Full Time”, “Unemployed”
– Trigger = Apply this rule when a field changes (field “Menu1”)
– Condition = But only if a field as a certain value (Menu 1 equals “Employment Status”)
– Then = Set menu field to include menu items (Menu2 to include “No Value”, “Part Time”, “Full Time”, “Unemployed”)

rule2

Custom Fields – Input Masks

Input masks are defined patterns that determine the format of information that can be typed in a text field.

Input masks are useful for preventing data entry errors when a text field has a specific input format that must be followed (for example, a phone number that must include parentheses and a hyphen, or an email that must include a @ and a ‘.’).

To define a mask pattern, two characters are required to represent one character or digit in a masked text field:

  • The first character does not display in the masked text field, but acts as a rule to define the acceptable input format.
  • The second character displays in the masked text field and acts as an input hint for staff members and customers.

The following table describes the first and second characters that define mask patterns:

im1

In a masked text field, the # symbol signifies a numeric character and the @ symbol signifies an alphabetic or non-numeric character. Formatting characters, such as spaces, hyphens, and parentheses, are static so staff members and customers cannot replace them with other characters

im2

Important Note: When the field is added to the workspace, the mask will appear to help the used fulfil the value. It will not let the user input numbers when letters are required or vice versa. The formatting characters will be fixed and cannot be removed, and the upper/lower case letters are entered even if the user does not ise caps lock or shift keys.

im3

When the field is exposed to the Customer Portal, the mask will appear below the field as an expected input.

hint_true

If you don’t want the mask to appear in the Customer Portal, you just have to edit the page and change the PHP code as follows:

<rn:widget path=”input/CustomAllInput” table=”incidents” always_show_mask=”false”/>

hint_false

Custom Fields

Custom Fields are created in the knowledge base to allow the collection of business-specific information, to best meet the organization’s needs.

After being created, custom fields can be added to workspaces and scripts, be used as search filters in reports, or as audience filters in RightNow Marketing and RightNow Feedback.

When creating a custom field, Admins can specify whether it is visible and editable on the Agent Desktop and, for some custom fields, visible and available to gather details on the Customer Portal.

Admins can also specify a data type for the field, choose whether the field is required or not, and set a default value.

Text field data types allow you to create an input mask to require that information entered in the field matches a defined format.

When Admins add or edit custom fields, those modifications may be completed in real time or scheduled and performed in the background.

cf1

Custom field visibility

When adding custom fields, there are several visibility options. The visibility options define where and how custom fields are presented on the Agent Desktop and the Customer Portal. For example, you can make a contact custom field visible to staff members when adding an incident, but restrict their ability to edit it.

Custom fields with end-user visibility are displayed on the Customer Portal. If you display a custom field that is not editable by customers, it does not appear on the Ask a Question page. There are other ways to determine visibility on the Customer Portal, such as widgets and page code.

Answer, incident, contact, opportunity, organization, sales quotes, and tasks custom fields must also be added to the appropriate record’s workspace.

The Admin Edit visibility setting must be selected in order for a custom field to be available to add to workspaces and scripts. Once a custom field is added to a workspace or script, its visibility, read-only, and required attributes are determined by the properties set in the workspace or script.

cf2