Dynamic Agent Desktop: Desktop workflows

When following elaborate business processes, staff members must often evaluate critical information and perform a variety of actions across multiple records. To help promote efficiency and reduce the chances for human error, RightNow CX lets you create highly customized desktop workflows that guide agents through complex customer interactions and data updates.

A desktop workflow is a sequence of workspaces, scripts, decisions, and actions – even other embedded workflows – that supports a business process. Using an intuitive design interface, you define a workflow by assembling a set of elements into a logical order to form a flow diagram, then adding decision logic to advance the flow.

Desktop workflow design canvas and ribbon

The workflow design ribbon includes three standard tabs (Home, Insert, and View) as well as two contextual tabs (Element Tools and Path Tools) that become visible when an element or connector is selected.

(Click to enlarge)
(Click to enlarge)

The Home tab gives you access to options that impact the entire desktop workflow. For example, you can select workflow elements, perform basic editing functions, add notes, and validate and preview the workflow.

The Insert tab allows you to add components to your flow diagram, either one at a time or in predefined workflow templates.

The View tab provides options for changing your view of the design canvas.

When you select an element or connector on the canvas, the ribbon displays a fourth contextual tab. When an element is selected, the Element Tools tab appears. This tab is divided into two sections. On the left are contextual groups and buttons, meaning they change depending on the element selected. On the right are standard groups and buttons, meaning they display no matter what element is selected.

Creating workflows

When designing a workflow, you can drag elements from the Home or Insert tab and order them on the canvas. The flow diagram is a graphical representation of the actions and decisions your workflow will perform and the order in which it will perform them. Your flow diagram can be as simple as a single path connecting a few workspaces or it can be complex, routing your staff members through dozens of workspaces, scripts, actions, and decisions.

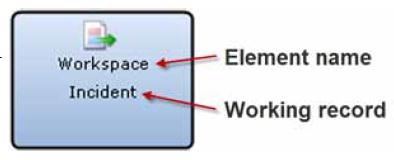
Each element on the canvas displays an icon and two labels that help to identify its function. The top label contains the element’s name. The bottom label identifies the element’s working record. The icon varies by element type as well as the working record’s record type.

(Click to enlarge)
(Click to enlarge)

Elements vary by shape according to their functions.

  • User Interface: Rectangular elements used to denote items that display to staff members, such as workspaces, scripts, and other embedded workflows.
  • Automation: Circular elements used to denote automated events that run in the background, such as setting field values and creating and saving records.
  • Search: Polygonal elements that require staff members to perform a search, such as loading a record or associating a record with another record.
  • Decision: Diamond-shaped and polygonal elements that denote logical evaluations that are used to branch the flow across two or more paths based on conditions that you define.
(Click to enlarge)
(Click to enlarge)

Workflow templates

The Template button group on the Insert tab of the workflow designer provides several predefined templates as a starting point for creating your workflow’s flow diagram. You can add and remove elements to further customize your workflow and then edit each element’s attributes to meet your business needs.

  • New vs. Edit: This template directs staff members to one workspace if they are creating a new incident and to a different workspace if they are opening an existing incident.
  • Add Task: This template displays an incident in a workspace and then automatically creates a new task for the incident.
  • Copy Incident: This template displays an incident in a workspace, and then copies the incident, sets fields in the copy, and displays the copy in another workspace.
  • Create Contact: This template checks whether an open incident is associated with a contact record. If no contact is associated, it automatically creates a new contact for the incident and sets contact fields before displaying the incident in a workspace.
(Click to enlarge)
(Click to enlarge)

Exporting workflows

If you have a workflow that you want to copy to another RightNow CX interface, you can export the workflow and then import it on the other interface. Exported workflows contain all included workspaces (with all elements, fields, controls, layout, and rules), decisions, actions, and other embedded workflows. Alternately, you can export the contents of your canvas as an image file for use as a visual reference.

Dynamic Agent Desktop: Agent Scripts

Agent scripts add powerful functionality to workspaces and workflows, leading staff members through a series of pages to help them enter information in a logical progression. Script pages can contain most fields and controls available to workspaces, with the exception of relationship items.

They can also include questions and branching logic, similar to guides, so you can create wizards to guide staff members to different pages based on the information entered or actions taken on a previous page. Combining branching logic with page layout capabilities, agent scripting provides your staff with a methodical, efficient interface for capturing information and resolving issues.

To further extend the efficiency provided by scripts, you can add script rules. Like workspace rules, script rules are triggered by events and conditions to perform actions on script pages, such as setting the value of a field or calling a named event.

Before you can create or access agent scripts, you first need to update your profile to include scripting permission. Staff members with scripting permission included in their profile can create, copy, and delete scripts from the Scripts explorer, as well as add them to workspaces and workflows.

(Click to enlarge)
(Click to enlarge)

Listed next to each script’s name is its script type, based on the type of record it is used to update. The script type determines which fields and controls can be added to the script. RightNow CX provides the following standard script types: Answer, Chat, Contact, Incident, Opportunity, Organization, Task. In addition, you can create scripts for custom objects that have Object is Available in Workspaces, Scripting, and Workflow field visibility. Scripts are not available for use in quote, quote product, or multi-edit workspaces.

(Click to enlarge)
(Click to enlarge)

Creating and editing scripts

Scripts are created on a script designer consisting of a design space, a ribbon, and a page selector. You define a script by dragging and dropping fields and controls from the ribbon onto the design space and arranging them as you want them to appear on the script page.

(Click to enlarge)
(Click to enlarge)

When you create a new script page, the design space consists of three areas – a header and a footer shared by all pages, and a main area for content specific to the page. You can add fields and controls to any of these areas.

You can also right-click an item on the design space to access contextual menu options. The available options vary based on the item you right-click but generally include such actions as branching to a page, resetting tab indexes, or deleting the item.

If you delete a script that is used in a workspace, the workspace will still include the Script control. You will need to edit the workspace to remove the control or select a new script for the control.

If you save changes to a script that staff members might be using at the moment, it is a good idea to have them log out and then log back in to be sure your changes have been applied.

If your script has only one page, you cannot remove it. When you remove a page with other pages branching off it, those pages are also removed. When you remove an item used by a rule or branch, the rule or branch will likely be impacted, and you will need to edit or delete it. When you remove a branch used to access a page, the page is not removed. However, this can result in an orphaned page if the deleted branch provided the only path to the page.

Headers and footers can contain any of the fields or controls you can add to script pages. Unlike the content you add to other areas of a page, which is displayed only on that page, the content you add to the header and footer is shown on every page where the header and footer is displayed.

The navigation panel contains 4 buttons that let you navigate between pages in the script even if there are no branches to the pages. Some of the buttons can be used in the When condition in branches and script rules, so you can create your own functionality for these buttons.

Since these buttons are available in a single control, you can quickly add the buttons to any page you want. The page footer contains this control by default. The following buttons are included in the control.

  • Beginning: Click this button to return to the first page of the script.
  • Previous: Click this button to return to the previous page in the script.
  • Next: Click this button to proceed to the next page in the script. By default, this is the next page that is on the same tree level, shown on the page selector, as the current page. However, a branch can be created to load a different page when this button is clicked.
  • Exit/Finish: Click this button to trigger any rules or branches that include the Exit Script Event Fires or Finish Script Event Fires triggers. When you are on the last page of a script, the Exit button is renamed Finish. This button is not enabled unless a rule or branch is configured to use one of these conditions.

Adding branches to scripts

Scripts use branching logic for guiding agents to specific pages based on conditions you specify. You can also create branches that are triggered when different responses are selected from question controls, such as the Radio Question or Menu Question controls, or from the Next, Exit, and Finish buttons on the navigation panel.

You can create branches quickly by right-clicking fields and controls on the design space. You can also define more complex branches using the Add Branch window.

(Click to enlarge)
(Click to enlarge)

Script rules

You can create script rules to trigger actions on script pages when the conditions you specify are met. For example, you can create a rule that automatically sets the value of a field on a script page when a button on the page is clicked or when the page is opened. Script rules impact only the script pages the rules are created on.

However, using named events, you can use script rules in conjunction with workspace rules to trigger an action on a workspace. For example, a workspace rule that sets the incident workspace’s Status field to Solved can be triggered when a staff member clicks a button on a script page.

Script rules, workspace rules, and workflow connectors can be triggered by actions taken by staff members, such as changing a field value or saving a record. However, they can also be triggered by other rules using rule-defined events. Events are defined by adding event fire actions, which vary by event type.

  • Named Event: Named events are defined by adding the Fire a Named Event action to a script rule or workspace rule and specifying a name for the event.
  • Exit Script Event: Exit script events are defined by adding the Fire Exit Script Event action to a script rule.
  • Finish Script Event: Finish script events are defined by adding the Fire Finish Script Event action to a script rule.

Scripts can be exported as XML files and then imported to other interfaces.

Dynamic Agent Desktop: Guided Assistance

Guided assistance gives agents and customers the ability to locate answers or text explanations by selecting responses from question branches in guides. This lets agents quickly find information they can provide to customers when working with them on the phone, when responding to an incident, or when chatting. In addition, guides can be embedded in answers so customers can use them on the customer portal.

Configuring guided assistance

You can create as many guided assistance guides as you need to help your agents and customers locate appropriate responses to questions related to different topics. Each guide can include multiple question branches, so you can use a single guide to lead agents to answers regarding different models of a product or multiple service plans.

You first need to edit your profile to include permission to create guides. Staff members with appropriate profile permission can create, copy, delete, and rename guides from the Guided Assistance explorer.

(Click to enlarge)
(Click to enlarge)

Creating guides

If you attempt to delete a guide that is being used in another guide, a dependency warning will list each location where the guide is used and provide you with an option to cancel the deletion.

When creating a guide, you add questions to the guide, add text for the question responses, and associate answers or text explanations with each response. You can also insert existing guides into other guides if you have a set of common questions and answers you want to use in multiple guides.

(Click to enlarge)
(Click to enlarge)

The questions you add to guides can be simple or complex. If you think your agents may need additional context to better understand a question, you can add a web page or an image that will appear with the question text.

For a guide to be valid, all questions in the guide must be associated with responses, and all responses must be associated with other questions or with one or more public answers or text explanations.

Once a guide has been saved, you can click the Create Answer button on the ribbon to create an answer to associate with your guide.

A Call URL node is used to link a guide response to an absolute or relative URL. For instance, a customer-facing guide could lead customers to a solution that requires the involvement of support agents. In this case, you could add a Call URL node to route customers from the guide to your site’s Ask a Question page.

You can also pass parameters through the Call URL function by defining name-value pairs in the question or response properties. For example, when linking to the Ask a Question page, you can pass parameters to automatically set values for fields such as Product, Category, or a custom field. To accomplish this, you must first update the question name to indicate the name of the parameter you want to set. You can then edit the response properties to set the value you want.

Alternately, you can add name-value pairs to question properties to declare a static parameter. Static parameters are parameters that are carried through a guide’s remaining branches and are passed through any Call URL function that exists in the question’s sub hierarchy. To test Call URL functions and parameters, click the Preview button and select an option for previewing your guide.

Adding guided assistance to workspaces

Before your agents can use guides, you must add the Guided Assistance relationship item to a custom incident or chat workspace. Once added, the Guided Assistance relationship item functions as a container for displaying guides to your staff on the agent desktop.

Guides can be displayed manually, based on a guide search or selection performed by an agent. They can also be loaded dynamically, based on a workspace or script rule. Guides can also be embedded in answers so customers can use them on the customer portal.

Several design options are available for the guide searching feature. By default, the Guided Assistance Search report is used when performing searches, but you can select a different search report to use instead.

Also, as an alternative to displaying the default Search for a Guide and Select a Guide buttons, you can display the guide search fields inline at the top of the control. You can also choose to hide the left navigation page if you want to restrict agents from jumping freely to different sections of the guide.

In addition, when the Guided Assistance relationship item is added to incident workspaces, the Guided Assistance button is automatically displayed on the ribbon. By default, this button provides both select and search options for locating guides.

(Click to enlarge)
(Click to enlarge)

Because guide content (such as question text) is highly contextual and not wholly descriptive of a topic, it is not indexed for searching. However, answers associated with each guide are very relevant to searching, so the content of those answers is indexed. For this reason, when a search is performed, the results are based on the content of associated answers, not on the content of the guides themselves.

Therefore, in order for a guide to be searchable, you must associate it to an answer. And so that it can be searched for intuitively, the answer’s content must be relevant to the topic addressed by the guide. There are two ways to associate an answer to a guide.

  • Associate the answer to a guide response: When editing the Guided Assistance relationship item on a workspace, you can select a response on the guide and use the Associated Answer button to associate an answer to it. This creates a natural association because, in this case, the answer is part of a solution path defined by the guide.
  • Select a guide from the answer’s Guided Assistance field: A guide may not contain any responses that link to answers from the knowledge base (could be associated only with text explanations). In this case, to make the guide searchable, you must associate it with an answer using the Guided Assistance field in the answer editor. On the default answer workspace, the Guided Assistance field is located on the Details tab. Here, the answer is associated with a guide named Service Plan Assistance, and the guide will be returned in guide searches when the search criterion matches the answer’s contents.

Guided assistance functions are available as triggers and actions when configuring rules for incident and chat workspaces. For example, you can design a rule on an incident workspace that will open a guide based on the incident’s product or category.

Once you create a guide, you can export it to a guide definition file and import it into other RightNow CX interfaces to create a new guide. You can also extract a subset of the guide’s questions and responses to either create a new guide or save to a guide definition file that you can then import into another site.

Dynamic Agent Desktop: Workspace Rules

The efficiency provided by custom workspaces can be extended even further using workspace rules. Workspace rules are an automation layer used to set properties for different workspace items based on actions and conditions occurring in the workspace. Workspace rules are not available for multi-edit workspaces.

Workspace rules can save your agents a lot of time by simplifying or completely automating routine tasks. For example:

  • If your workspace contains a lot of fields and controls, you can use rules to show only the information that is relevant based on the type of interaction, the data being entered, or the identity of the contact or agent.
  • If a specific tab on the workspace correlates to a specific incident category, you could add a rule that focuses a specific tab based on the category value when the editor loads.
  • If agents are required to select from a certain subset of dispositions when solving incidents, you could create a workspace rule to make the Disposition field required and hide several of its items when incidents are set to Solved.
  • If incidents are escalated among groups based on product and profile, you could add a rule that sets the Assigned field to a specific group based on the product value selected and the profile of the logged-in staff member when a certain button control is clicked.

With workspace rules, you can dynamically adjust the display, behaviour, and values of fields and controls on a workspace based on staff member actions.

Each rule is triggered by one or more events and conditions you define, and can result in one or more actions, including the following:

  • Set the value of a field
  • Set the required status of a field
  • Make a field or control read-only
  • Show or hide a field or control
  • Show only a select group of menu items
  • Open a guided assistance guide
  • Open a specific script
  • Create a named event to trigger another workspace rule or a script rule

At a basic level, each rule defines a triggering event and a resulting action that will occur after the event is triggered.

There are two types of actions: Then and Else. Every rule has at least one Then action, which is the result of the triggering event and conditions. However, once conditions are specified for a rule, you can also add one or more Else actions. An Else action is triggered in cases where the rule’s conditions are not met.

Since business rules are checked after workspace rules, changes made to a record by workspace rules can be overridden by business rules if the rules have similar actions.

Rules are created using the Rule Wizard. The rule wizard is opened by clicking the Rules button on the ribbon.

(Click to enlarge)
(Click to enlarge)

Once you add rules, you can easily edit them, reorder them, or delete them once they are no longer needed. Rules are fired in the sequence in which they are listed. Adjusting them can impact how other rules affect the workspace.

Dynamic Agent Desktop: Workspaces

The dynamic agent desktop in RightNow CX is your staff members’ portal to your knowledge base. It is comprised of a set of complementary features. One of them is the Workspace, a configuration of the content pane, including the fields, controls, and ribbon that display when working with answers, contacts, incidents, opportunities, organizations, tasks, chat, etc.

Workspaces define the appearance of the agent desktop when staff members add, view, and edit records in RightNow CX. When you open a record the workspace determines the layout of fields, controls, and tabs on the content pane as well as the arrangement of buttons on the ribbon and the Quick Access toolbar.

The workspaces used by staff members are defined in their staff profile, with one workspace associated for each type of record the profile can access. Different profiles can use different workspaces. However, each editor within a profile must be set to use a specific workspace, so all staff who shares a profile will use the same set of workspaces.

Listed next to each workspace’s name is its workspace type, based on the type of record it opens. The workspace type determines which fields and controls can be added to the workspace.

Some workspace types are multi-edit, meaning they are used when staff members open multiple records of the same record type at the same time (up to 250 records can be edited at once).

(Click to enlarge)
(Click to enlarge)

Custom workspaces are used to provide your team with access to records stored in custom objects. Custom workspaces are created on a workspace designer consisting of a ribbon and a design space. You define a workspace by dragging and dropping fields and controls from the ribbon to the design space.

You can create a custom workspace from scratch by starting with a blank workspace. You can also copy an existing workspace or import a workspace from an exported workspace file to use as the basis for a new workspace. Then you can tailor the design by adding and removing fields and controls, adjusting properties, and arranging the layout to suit your business needs.

To create a custom workspace click new on the ribbon and in the Start With a Blank Workspace section, select a workspace type.

(Click to enlarge)
(Click to enlarge)

If you delete a workspace that is selected for a standard object editor in a profile, the profile will revert to the standard workspace for the editor type. If you delete a workspace that is selected for a custom object editor in a profile, the profile will revert to no workspace selection.

By default, most workspace types are blank on top with a single tab on the bottom. You can adjust the location of the tabbed area on the workspace. You can also adjust the space allotted to the two main areas of the workspace.

(Click to enlarge)
(Click to enlarge)

If you save changes to a workspace that staff members are using at the time, they will need to log out and then log back in to see the changes you have applied.

To save time when creating workspaces in multiple interfaces, RightNow CX lets you export a workspace as an XML file containing descriptions of all the workspace elements, including fields, controls, layout, and rules. The XML file can then be used by the import wizard to import the workspace to another interface.

Workspace notes are not included when exporting a workspace to an XML file. When a workspace is exported as an XML file, the file includes a hash value that will be used when the file is imported to determine if the file has been modified externally. If the file has been modified, it will not be available for importing, and an error message notifies you that the file is invalid.

If items from the workspace you are importing are not used by the workspace type you are converting it to, the next window lists these invalid items and informs you that they will be replaced by spacers, field placeholders, or removed from the imported workspace.

(Click to enlarge)
(Click to enlarge)

Oracle RightNow CX – Contact Center Experience

Picture4
The Contact Center Experience delivers end-to-end management of the customer journey through unified records, interfaces, and knowledge.

Even junior agents are able to deliver exceptional experiences consistently across every channel for operational efficiency and service excellence.

Contact Center Experience services

  • Dynamic Agent Desktop
  • Knowledge Foundation