As it was stated before, to create or customize the Customer Portal pages, you will need a WebDAV client to download/upload the files, and you will use a text editor to edit the files. This post shows how to do it.
Step 1: Download and install a WebDAV software. Oracle recommends Cyberduck.
Step 2: Run Cyberduck and open a new connection.
Step 3: Set up a connection to your Customer Portal:
If you input your RightNow Customer Portal site on the Server field, the URL and port should come automatically. Then un-tick the Anonymous Login check box, input your admin credentials and click Connect.
Step 4: Open the folders and sub-folders until you find the file you want to change (in this case we went to the home.php file by navigating to cp/customer/development/views/pages)
Step 5: Select the file you want to change, right-click and choose Download to save the file in your local machine.
Step 6: Open the downloaded file in a text editor, change it and save it.
Step 7: Go back to Cyberduck, right-click the file you want to update and choose Upload.
Step 8: To check your changes open a browser, navigate to your Customer Portal admin site (http://example.rightnowdemo.com/ci/admin) and click View Development Area.
Step 9: Make sure that the Customer Portal you are viewing has the Customer Portal Development Area sign on top.
The Customer Portal incorporates an intuitive, easy-to-navigate file structure that lets you clearly identify the files you can edit. The main directory is called cp, and it includes the following main folders:
The core folder: All the non-editable Customer Portal files.
The customer folder: The Customer Portal files you can edit, including all pages and custom widget files used on your development site, as well as assets (CSS, images, and themes) and error pages.
The generated folder: All staged files and all files you have promoted to your production site.
The logs folder: Logs for each staging, promoting, and rollback operation.
Core Folder
The core folder contains all of the underlying Customer Portal code. You cannot add or remove files in this folder, nor can you edit any of the folder names or files.
assets: The core/assets folder contains all web assets used by the Customer Portal Administration site, organized in the following subfolders: debug-js, default, ejs, and images. The default subfolder contains the CSS, images, and themes for the pages, templates, and widgets in the reference implementation. You can always use these files to view and revert to the reference implementation.
framework: This folder is the core of the Customer Portal code base and contains all view files for the pages and templates. It also contains files and information about version changes, controllers, libraries, models, and utilities.
widgets: The widgets folder contains the files for all standard widgets, including controllers, views, CSS, images, logic, and YAML information files. You can use these files to the view the code for the standard widgets.
Customer Folder
The customer folder contains all the Customer Portal files you can modify, organized in the following subfolder structure.
assets: This folder contains the assets you can add, edit, and delete, including the subfolders css, images, and themes. Assets include all files for your customer portal that are not pages, templates, or widgets, including CSS, JavaScript, images, video, and other rich web media. You can add, remove, edit, and execute files and add subfolders to the assets folder. In addition to the css and images subfolders, the assets folder includes a default subfolder that contains default versions of the asset files provided in the reference implementation. If you make changes to any of the assets and then decide to revert to the standard assets, you can copy them from the default subfolder.
Important Note: With the exception of the themes subfolder, all other files in the assets folder are shared by development and production files. Even if you don’t stage and promote your development pages, changes you make may affect the look and function of your production pages. For example, if production pages call a file in the assets folder and you modify that file in the course of your development work, the change will be immediately visible to your customers.
Important Note: Although all other files in the /cp/customer/assets/ folder are shared between the production and development areas, files in the themes subfolder of /cp/customer/assets/ are used strictly by the development files. When you stage the develop- ment pages, these files are copied to a time-stamped folder in the staging directory and called from that folder. The themes you develop are kept in this isolated sandbox that cannot be accessed by production files. The themes are applied to your production site only when you promote the staged files into production.
development: The development folder is your working folder, containing all templates and pages to create and update your customer portal. It contains the following subfolders.
error: Contains three editable error pages and splash.html, which is a page displayed to customers when your site is being upgraded. You can edit the splash file to display whatever information you want.
Generated Folder
The generated folder contains two subfolders: production and staging, which mirror the structure of the /cp/customer/development subfolders. The staging subfolder contains the development files that you have staged through the CX Console or the Customer Portal Administration site. Your customers cannot see the files in the staging folder. The production subfolder contains the staged files that have been promoted into production. Those files are visible to your customers. Both subfolders also have a backup subfolder that contains the original source code from the previous staging and promoting activities. The staging folder includes a themes subfolder that is copied from your development site when you stage the development pages. These folders allow the rollback function. None of the files in the generated folder can be edited or deleted. Nor can you add any files.
The logs folder
The logs folder contains logs for every stage, promote, and rollback operation performed on your site as well as a log that documents changes made to Customer Portal files so you can see when and by whom the files were modified.
The Customer Portal is the company’s customer support interface, where customers can search for information, submit questions to the support team, request chat sessions or even ask the peer-to-peer community (if there is one) for help. Normally the Customer Portal is embedded on the company’s website.
The configuration of the Customer Portal is done by editing Templates, Pages, and Widgets which are part of the site. So it is important to understand the structure of the Customer Portal. Other Customer Portal configurations can be done through the Admin interface (aka Agent Desktop or Console).
Before going deeper on the Customer Portal stuff, it is important to keep in mind the following:
There is something called the reference implementation that is the set of default pages and files that make up the Customer Portal as it exists before you configure and customize it. There are two default reference implementations: one for the standard pages (desktop browsers) and one for display on mobile devices.
To create or customize the Customer Portal pages, you will need a WebDav client to download/upload the files, and you will use a text editor to edit the files.
To set up other functionalities – such as SmartAssistant and search options – you will use the Admin interface (aka Agent Desktop or Console)
Customer Portal File Structure
As stated before the templates, pages, widgets, and other assets used to create the Customer Portal are available through WebDAV.
The customer portal uses WebDAV to help you manage your website files. WebDAV offers a familiar file structure, easy uploading and downloading of multiple files, and file security through login access. After you set up a WebDAV connection to upload and download files, you can use any text editor you want to create and edit files for your customer portal, or you can use Adobe Dreamweaver, which uses its own WebDAV protocol for site management and configuration (Oracle recommends using Cyberduck for WebDAV access to Customer Portal files)
Important Note: You must enable MOD_CP_DEVELOPMENT_ENABLED before you can make changes to your development site. If you do not enable this setting, you cannot make changes to your customer portal and your customers will see the default reference implementation with no customization.
To view the Customer Portal files from the Customer Portal Administration site, using a URL:
If you have not already logged on to the Customer Portal Administration site, enter your RightNow user name and password.
Click the cp link to display the folders.
Click the folder you want to display files for and continue drilling down through subfolders to display the file you want.
When you click an individual file name, it will open
Important Note: Although it is possible to edit files directly on the server, it is recommended downloading files to the local workstation, making changes locally, and then uploading them back to the server.
Page sets
The Customer Portal contains four sets of pages, each of which can be viewed from the Customer Portal Administration site.
Development files: These are the files to work with when you want to make changes to the Customer Portal. They cannot be seen by the customers until you stage and promote them. The page and template files are in the /cp/customer/development/views folder, and the custom widgets are in /cp/customer/development/widgets/custom.
Staging files: After editing the development pages, you can stage them, which means they are compiled and optimized to look and perform as they will on the production site. These files, located in /cp/generated/staging, are not editable, nor are they visible to the customers.
Production files: The production files, located in /cp/generated/production, have been promoted from the staging site and are visible to the customers.
Reference implementation files: These are the default, read-only files that make up the original customer portal reference implementation before you modify them. They are located in /cp/core/framework/views and /cp/core/widgets. If you’ve made changes to one of your development files that you don’t want to keep, you can revert to the original file by copying the original from its reference implementation folder and pasting it to the appropriate subfolder in /cp/customer/development, effectively overwriting your changes.
You can offer your customers an invitation to a chat session if they have conducted searches without finding the results they are looking for. You can do this on your customer portal pages, and you can also offer a chat session from any external page on your website.
The following summary of events occurs when a customer accepts a chat offer through the ProactiveChat2 widget or the syndicated ProactiveChat widget.
Before the chat is offered to the customer, the chat session routing rules determine what queue the chat request will be directed to based on products, categories, custom fields, and other rule conditions.
When the customer accepts the chat request, the chat page that opens contains by default any incident custom fields that have chat visibility. If you have edited the page to add the ability to select products or categories, they will also appear.
If the customer changes any of the information on the chat page, that information is passed to the agent on the chat session workspace. However, the rules engine does not run again. As a result, the customer may change a field that would have triggered the chat being assigned to a different queue, but because rules are not run on the updated chat page, the original queue assignment does not change.
Chat sessions are not offered in the following situations:
If the customer’s browser does not accept cookies, no chat is offered during the customer session.
If the widget looks for a chat queue ten times without finding one, no chat is offered on that page.
If a chat is offered (whether or not it is accepted), a cookie is set and no more chat offers are made during the current customer session.
If a chat is offered and the customer refuses, a cookie is set and no more chat offers are made for 30 days.
Offering a chat on customer portal pages
You can put the ProactiveChat2 widget on any page. RightNow Chat must be enabled and agents must be available before a chat will be offered to a customer. Additionally, the customer’s browser must be configured to accept cookies.
Important: The default code for the ProactiveChat2 widget will not trigger a chat offer until you add an attribute that defines the trigger for the offer. Therefore, you must add at least one of the following attributes to the code: seconds, searches, or profile attributes. If you do not specify one of these, the widget will not offer a chat session. Alternatively, you can define an event that will trigger a chat offer by creating a custom widget based on the ProactiveChat2 widget.
To add the ProactiveChat2 widget to the Answers page
1. Open the list.php file in the /views/pages/answers folder
2. Locate the following code.
<rn:widget path=”reports/Paginator” />
3. Add the following code immediately after the code you found in step 2.
<rn:widget path=”chat/ProactiveChat2″ />
4. To trigger the chat offer based on the customer’s inactive time on the page, add the seconds attribute to the code, which will resemble the following.
6. To trigger the chat offer based on the customer’s profile information, including organization, SLAs, and default product and category, refer to the section “Triggering chat offers on profile attributes” on this post.
7. To trigger the chat offer based on an event, refer to the section “Triggering a chat offer by an event” on this post.
8. Save list.php.
Configuring the ProactiveChat2 widget attributes
The default code for the ProactiveChat2 widget will not trigger a chat offer because the default values for the seconds, searches, and profile_ attributes are 0. You must define at least one of these attributes before the chat offer will be triggered.
When one of these attributes has been met, an AJAX request is made to the server, which then sends back the number of available agents and the minimum wait time. If a product or category can be determined through search terms or answers or incidents viewed, the queue ID for that product or category is also returned. This information is then matched against any additional widget attributes.
You can configure any of the following ProactiveChat2 widget attributes
– Chat triggers
Number of seconds on page
Number of searches conducted
Profile attributes (profile_item, profile_operator, and profile_value)
– Display and function
The wording of the chat invitation
The chat login page that opens when customers accept
Whether the chat login page opens in a new window or the same one
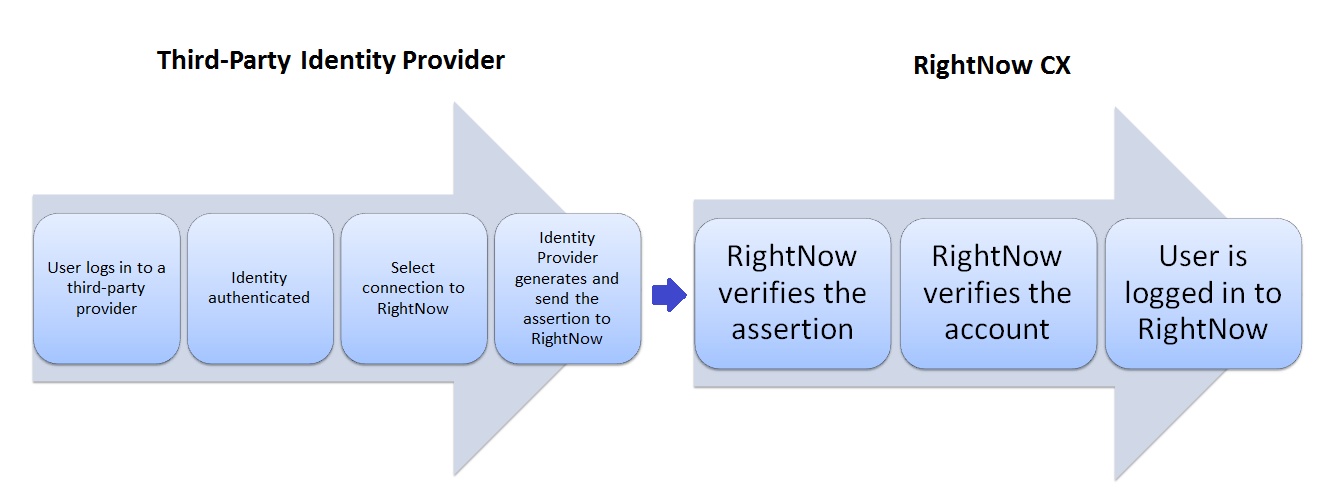
RightNow CX includes single sign-on (SSO) support for agents working on the RightNow CX Console and customers using the customer portal. Instead of logging in with their RightNow CX user name and password, agents and customers log in to a third-party identity provider, which authenticates their identity.
Then they select a connection to the application, either the RightNow CX Console for agents or the customer portal for customers. The identity provider first verifies their login. It then encapsulates the result of that verification in an assertion that is signed using an X509 certificate and sends the assertion to RightNow CX.
The application verifies the signature and (if successful) accepts the account information for logging in to the RightNow CX system. The assertion sent by the identity provider uses SAML 2.0 (Security Assertion Markup Language) architecture.
Note: This implementation of SAML 2.0 open login lets RightNow CX accept identity provider assertions, but not initiate them. Single logout is not supported.
Single Sign-On Process Overview:
(click to enlarge)
Customer login
The following process occurs when single sign-on is enabled for customers logging in to the customer portal.
(click to enlarge)
A customer enters a user name and password to log in to an identity provider. When the identity provider verifies the information, the customer is logged in.
The identity provider displays a list of service providers, including the customer portal, that the customer can connect to.
The customer selects the customer portal.
The identity provider generates a signed SAML 2.0 assertion using the contact’s email address, contact record ID, login name, or a contact custom field as the assertion subject.
The identity provider then submits the assertion, using HTTP POST binding (since that is the only binding method RightNow CX supports), to the customer portal openlogin controller at http://<your_site>.custhelp.com/ci/openlogin/saml/. This controller calls the SSO validation and logs in contacts.
RightNow CX decodes the assertion, validates the customer by confirming that the assertion matches a contact record in the RightNow CX database, and logs the customer in on the customer portal’s Support Home page. (A redirect parameter can specify that a different page opens instead).
Note: Contact records cannot be created through the SSO process, so only existing customers can be logged in (The public API can be used to create or update contacts if necessary).
Note: The assertion must be signed using W3C XML signature recommendations. If the certificate used to sign the assertion is self-signed, it must be uploaded to the Additional Root Certificates (certs/root/) directory in the File Manager. The certificate must also be listed in the SAML_20_SIGN_CERTS configuration setting or it will not be accepted for SAML signing. Additionally, the assertion cannot be encrypted.
Setting up single sign-on
Complete the following steps to configure single sign-on for your site.
Contact Oracle RightNow account manager to enable SSO for agents or customers or both
Enable single sign-on profile permission (for Agents).
Define configuration settings.
Set up one or more identity providers.
Defining configuration settings
1. Click the Configuration button on the navigation pane.
2. Double-click Configuration Settings under Site Configuration. The content pane displays the Configuration Editor
3. Edit SAML_20_SIGN_CERTS and USE_KNOWN_ROOT_CAS (on Common > General > Single Sign-On) according to the following descriptions (click the Update button after editing the value for each setting).
SAML_20_SIGN_CERTS: Identifies the only certificates that are accepted for SAML 2.0 signatures. The special value of “ANY-TRUSTED” may be used to accept any certificate that is trusted by the root CAs for the site. If the “ANY-TRUSTED” setting is used it is highly recommended that the USE_KNOWN_ROOT_CAS setting be disabled for security reasons. Default is blank.
USE_KNOWN_ROOT_CAS: Controls whether the known root certificate authorities list that is embedded within the Oracle RightNow server is consulted when verifying X509 certificates. For example, when checking S/MIME email or SAML 2.0 signatures. Default is enabled (Yes).
4. Click the Commit and Exit button
5. Edit SAML_ERROR_URL (on Common > Single Sign-On > General) according to the following description
SAML_ERROR_URL: Specifies the URL that users will be sent to when their SAML SSO log-in attempt fails. This setting supports %error_code% and %session% placeholder variables. These will be replaced with the error code the user encountered and the session of the user if the user has cookies disabled. Default is blank.
6. Click the Update button, and then click the Commit and Exit button.
Setting up identity providers
In order for RightNow CX to accept SAML 2.0 open login assertions from third-party identity providers, each identity provider needs to be configured to send the assertion URL to the RightNow CX application, either to the SSO launch page for agent login or to the customer portal openlogin provider for customer login (or to both).
RightNow CX can accept authentications from multiple identity providers. Configuration details vary from provider to provider, so each one must be configured separately to make the application available through the identity provider. The following list includes some requirements and constraints you must consider as you configure an identity provider
RightNow CX does not support the import of SAML 2.0 metadata.
RightNow CX supports single sign-on only when it is initiated by the identity provider. It does not support RightNow CX-initiated sign-on, nor does it support single logout.
RightNow CX does not support decryption of the SAML 2.0 assertion, so the identity provider should not be set up to encrypt the assertion. Instead, use an SSL connection for confidentiality.
RightNow CX supports only the HTTP POST binding type, so the identity provider should be configured to send SAML responses and assertions using that method.
The certificate used to sign the assertion must be included as part of the assertion in the XML signature.
The identity provider server is expected to be time-synchronized with the Oracle RightNow server, so a validity range of plus or minus five minutes of the SAML assertion should be adequate.
Identifying the SAML subject for contact login
The parameter used to identify the SAML subject contents should be passed to the customer portal openlogin controller as a GET parameter. The format of the URL is:
/ci/openlogin/saml/subject/{SAML_subject}
For example: /ci/openlogin/saml/subject/contact.emails.address
The subject value must be unique in order for the single sign-on to be successful. The parameter, named subject, is optional and defaults to contact.login. Its values include the following:
contact.emails.address – The assertion subject is the contact email address, and the value can be the contact’s primary email address or one of the alternate email addresses. The contact.emails.address value is case insensitive.
contact.id – The assertion subject is the contact ID in the Oracle RightNow database.
contact.login – The assertion subject is the contact login, which is the preferred mapping since it requires no lookup from the database. This is the default mapping value if subject is not set. The contact.login value is case sensitive.
contact.customfields.[customfield-name] – The “customfield-name” variable is the actual name of the custom field in the database (as well as the name of the database column), and the assertion subject is the contact custom field value. The assertion subject is then passed to the API as CustomField and the name in the subject GET parameter is sent to the API as the CustomFieldName value. The c$ prefix will be added if necessary.
Note: The custom field value is case insensitive. The following contact custom field data types are not supported for use in an assertion.
Menu
Yes/No
Date/Time
Date Field
Opt-in
Redirecting after login
After the assertion has been verified and customers are identified and logged in, they will be directed to the customer portal Support Home page by default. If you prefer to direct them to another page, you can add a redirect parameter to the URL that passes the subject parameter. The redirect parameter can point to any customer portal page (/app/*) or controller endpoint (/ci/* or /cc/*). It must follow the subject parameter, as shown in the following example URL.
The RightNow Intent Guide uses natural language searching to return results that guide customers directly to the information they need. Using best-in-class semantic search technology combined with industry-specific linguistic dictionaries and advanced algorithms, your customers’ questions are matched to the most relevant content to deliver the right answers immediately.
The CombinedSearchResults widget used with Intent Guide can return not only the search results from natural language searching, but also answers from your knowledge base and posts from RightNow Community.
Intent Guide searches do not support the use of wildcards. As a result, although wildcard searching may return results from the knowledge base and community posts, it will not return Intent Guide search results unless the wildcard character is part of the answer.
Configuring Intent Guide
Before you begin editing customer portal pages for Intent Guide, you’ll first need to define Intent Guide configuration settings.
1. Log in to RightNow CX
2. Click the Configuration button on the navigation pane
3. Double-click Configuration Settings under Site Configuration
4. Click RightNow Common
5. Click INTENT_GUIDE_ENABLED under RightNow Intent Guide > General
6. Select the Yes radio button, click Update, and then click Commit and Exit
(Click to enlarge)
Important: Additional setup is required to implement Intent Guide on your site. Contact your Oracle RightNow account manager to schedule this work.
7. To change the URL of the page that displays an Intent Guide answer from the default answers/intent, change the value of CP_INTENT_GUIDE_URL.
a. Click RightNow User Interface
b. Select CP_INTENT_GUIDE_URL under Customer Portal > Pages
c. Type the page name in the Value field
d. Click Update
8. Click Commit and Exit
(Click to enlarge)
Overview of Intent Guide on the customer portal
By default, Intent Guide is not configured as part of the customer portal reference implementation. However, a default intent.php file is included in the standard and mobile page sets to display individual Intent Guide answers that appear in the search results. Two widgets – IntentGuideDisplay and CombinedSearchResults – are also included among the standard widgets.
Note: If your Oracle RightNow account manager has implemented Intent Guide on your site and you have configured the site, you can modify the customer portal pages to take advantage of the feature.
Intent Guide search results may link to absolute URLs as well as answers in your knowledge base. Duplicate answers returned in both the knowledge base results and Intent Guide results are removed from the knowledge base results.
Note: When answers created on the Intent Guide site reference answers in the RightNow CX knowledge base, duplicate answers are removed only when the RightNow CX answers are referenced by their answer IDs. If the Intent Guide answers use URLs to reference RightNow CX answers, the customer portal page will display duplicate search results.
Note: Knowledge base answers displayed in the Intent Guide results section of the page are not checked for status, so all relevant answers are displayed with a link. If customers click a link for a private answer in the Intent Guide search results, they will not be able to view the answer. Answer IDs are not validated, so Intent Guide results that point to invalid answers in the RightNow CX knowledge base will still appear as links on the page.
Answer types that are not supported in Intent Guide include SQL, XML, action, JavaScript, and local URL. These answers will be stripped from the result set before being displayed.
To use Intent Guide, you’ll edit the Answers page (or the answers list page on the mobile implementation) to display Intent Guide search results. Instead of displaying individual answers on the answers/detail page, the customer portal displays them on the answers/intent page that is called when Intent Guide is used.
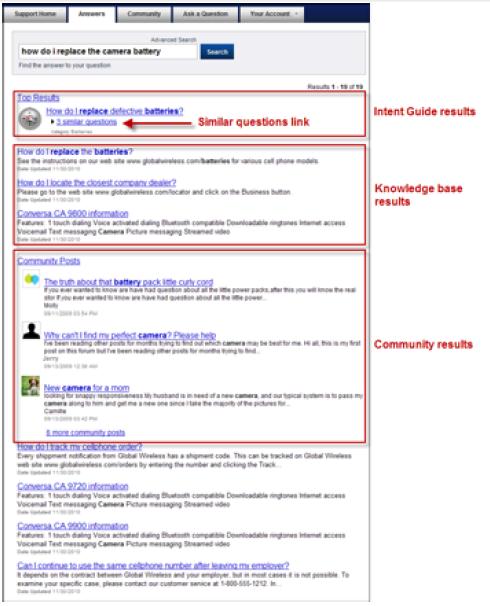
When Intent Guide is enabled and the standard Answers page is edited, the search results are displayed by the CombinedSearchResults widget and resemble the following figure.
The Intent Guide results may display a Similar Questions link. When customers click the link, a screen similar to the following figure appears.
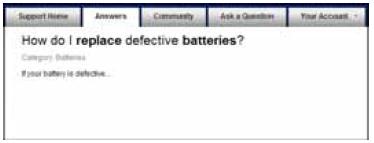
Selecting an individual answer results in a display that resembles the following figure. This answer is displayed using the IntentGuideDisplay widget on the answers/intent.php page.
Adding Intent Guide functionality to standard pages
The following steps provide an overview of customer portal changes required to use Intent Guide
Step 1: Remove the AdvancedSearchDialog from the Support Home page. Since the search results from Intent Guide and the Community cannot use advanced search filters, we recommend removing them from the page to avoid confusion for your customers. The search field now appears without the Advanced Search link.
1. Open the home.php file in the /views/pages folder.
2. Delete the following line of code:
Step 3: Edit the Answers page to remove the AdvancedSearchDialog widget as you did on the Support Home page. Then you’ll replace the Multiline2 report widget, which displays standard search results, with the CombinedSearchResults widget, which displays results from Intent Guide, the knowledge base, and community posts. You’ll add an attribute to the ResultInfo2 attribute to display results from the combined search.
To edit the Answers page for Intent Guide:
1. Open the list.php file in the /views/pages/answers folder.
2. Delete the following line of code:
4. Replace the code you located in step 3 with the following:
<rn:widget path=”search/CombinedSearchResults”/>
5. To prevent the display of one or more types of results, perform one or more of the following actions.
a. To prevent the display of knowledge base answers, click here.
b. To prevent the display of Intent Guide results, add intent_guide_results=”0″ to the code you added in step 4.
c. To prevent the display of community posts, add social_results=”0″ to the code you added in step 4.
7. Add the combined_results attribute to the ResultInfo2 code you located in step 6. If you want to display all the search results, set the attribute value to “all” as in the following code.
6. Add the display_knowledgebase_results attribute to the ResultInfo2 widget as you did to the CombinedSearchResults. Also add the label_results attribute to the code to change the Results label. (The default value is similar to “Results 1 – 10 of 45,” while this edited version displays “Results 1 – 10.”)