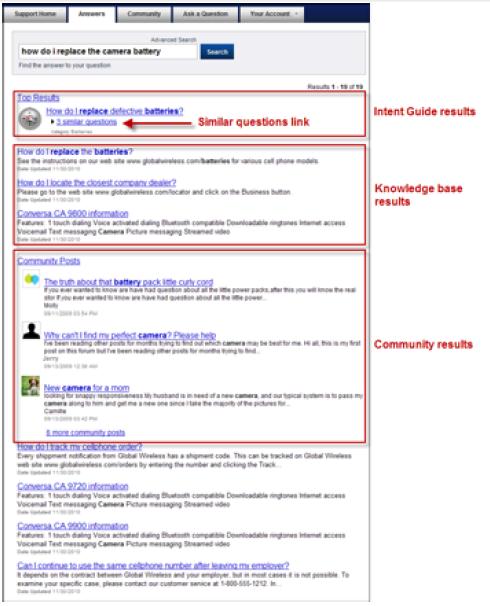
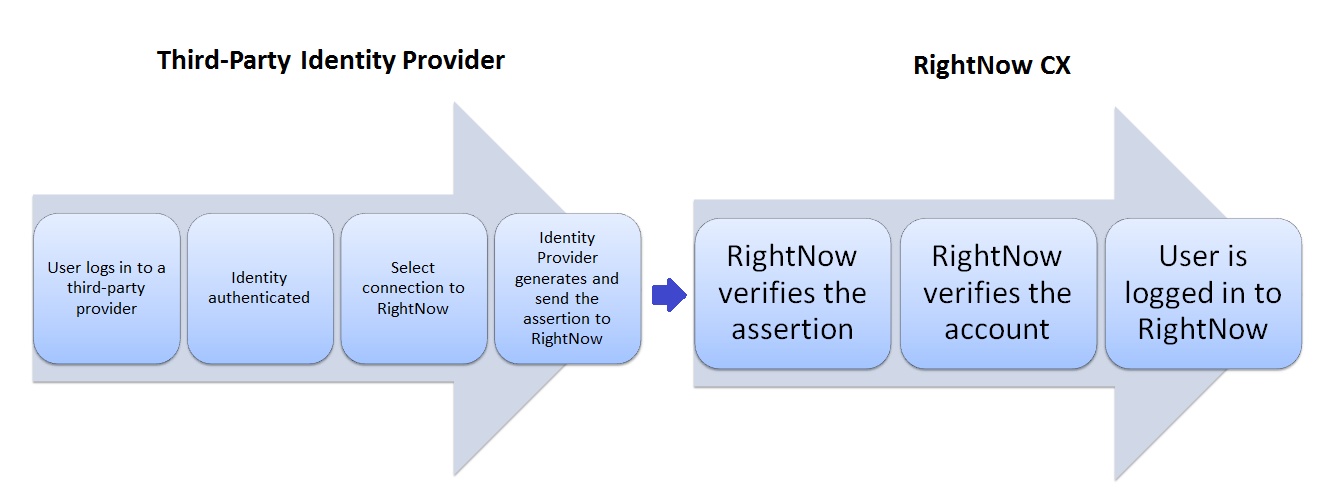
Customer Service: Answers – Organizing answers

Through click-track analysis and feedback on answers, your answers are automatically organized. Answer rankings are constantly updated using the solved count value and presented to your customers with the most useful information first. RightNow uses 3 techniques to gather useful information about answers.

  • Explicit customer feedback: By default, the Answers page offers customers a way to rate answers through the “Was this answer helpful?” option. Their responses automatically raise or lower the solved count of answers.
  • Explicit ranking of the answers: You can explicitly rank answers at certain levels in the knowledge base using the Display Position setting. This is often useful when new issues arise.
  • Click-track analysis: RightNow analyses the path each customer takes through the knowledge base. The use and benefits are two-fold:
  1. Answer relatedness: An affinity map is built which relates answers that customers view to other answers viewed during the same visit. Through the SmartAssistant feature, RightNow Service suggests answers to them based on the historical relationships of that answer to other answers in the knowledge base. The suggested answers appear as learned links on the Relationships tab.
  2. Implicit ranking: The click-track data is also used for answer ranking. Each time an answer is viewed by a customer or suggested by an agent, its solved count is increased

The Solved Count feature collects information about the usefulness of answers in your knowledge base and uses this data to rank your answers. Implicit data is compiled by how customers select and view answers. Explicit data is compiled by how customers rate the effectiveness of individual answers. Both long-term and short-term solved counts are used to calculate the score. Solved counts from the customer portal account for 75% of an answer’s score, and agent solved counts for 25 %. Using the solved count values, RightNow can dynamically rank the answers by their usefulness and present customers with the most effective answers first.

An answer’s score value is a calculated value equal to the answer’s solved count combined with any “fix at” positions specified for the answer in the Display Position drop-down menu when adding or editing an answer.

  • Implicit ratings: gathered as customers view answers. If a customer views an answer, the solved count of the 1st answer is increased, but not as much as the 2nd viewed answer. In other words, the answer that the customer views last receives the largest solved count increase. Previously viewed answers receive a smaller increase in their solved counts. The solved count is also increased when an agent uses a SmartAssistant suggested answer when responding to a customer’s question.
  • Explicit ratings: gathered from the response to the question, “Was this answer helpful?”. This question is displayed on the Answers page on the customer portal.

Over time, an unused answer’s solved count will gradually decline or age. For example if an answer has not been viewed for 30 days (the default setting), the solved count will automatically be reduced. The solved count of unused answers also declines at a constant rate over time. Ultimately, if an answer has not been viewed for an extended period of time, the answer’s solved count can reach zero.

When an answer’s solved count reaches zero, this usually means that the answer has not been viewed for a long time, and it is safe to assume that the information may be outdated or not useful. By default, these aged answers are automatically set to the Review status when their solved count reaches zero. This enables you to easily sort the outdated answers and update them.

When a customer submits comments or suggestions from the feedback form, an unresolved incident is automatically created.

Customer Portal: Intent Guide

The RightNow Intent Guide uses natural language searching to return results that guide customers directly to the information they need. Using best-in-class semantic search technology combined with industry-specific linguistic dictionaries and advanced algorithms, your customers’ questions are matched to the most relevant content to deliver the right answers immediately.

The CombinedSearchResults widget used with Intent Guide can return not only the search results from natural language searching, but also answers from your knowledge base and posts from RightNow Community.

Intent Guide searches do not support the use of wildcards. As a result, although wildcard searching may return results from the knowledge base and community posts, it will not return Intent Guide search results unless the wildcard character is part of the answer.

Configuring Intent Guide

Before you begin editing customer portal pages for Intent Guide, you’ll first need to define Intent Guide configuration settings.

1. Log in to RightNow CX
2. Click the Configuration button on the navigation pane
3. Double-click Configuration Settings under Site Configuration
4. Click RightNow Common
5. Click INTENT_GUIDE_ENABLED under RightNow Intent Guide > General
6. Select the Yes radio button, click Update, and then click Commit and Exit

(Click to enlarge)
(Click to enlarge)

Important: Additional setup is required to implement Intent Guide on your site. Contact your Oracle RightNow account manager to schedule this work.

7. To change the URL of the page that displays an Intent Guide answer from the default answers/intent, change the value of CP_INTENT_GUIDE_URL.
a. Click RightNow User Interface
b. Select CP_INTENT_GUIDE_URL under Customer Portal > Pages
c. Type the page name in the Value field
d. Click Update
8. Click Commit and Exit

(Click to enlarge)
(Click to enlarge)

Overview of Intent Guide on the customer portal

By default, Intent Guide is not configured as part of the customer portal reference implementation. However, a default intent.php file is included in the standard and mobile page sets to display individual Intent Guide answers that appear in the search results. Two widgets – IntentGuideDisplay and CombinedSearchResults – are also included among the standard widgets.

Note: If your Oracle RightNow account manager has implemented Intent Guide on your site and you have configured the site, you can modify the customer portal pages to take advantage of the feature.

Intent Guide search results may link to absolute URLs as well as answers in your knowledge base. Duplicate answers returned in both the knowledge base results and Intent Guide results are removed from the knowledge base results.

Note: When answers created on the Intent Guide site reference answers in the RightNow CX knowledge base, duplicate answers are removed only when the RightNow CX answers are referenced by their answer IDs. If the Intent Guide answers use URLs to reference RightNow CX answers, the customer portal page will display duplicate search results.

Note: Knowledge base answers displayed in the Intent Guide results section of the page are not checked for status, so all relevant answers are displayed with a link. If customers click a link for a private answer in the Intent Guide search results, they will not be able to view the answer. Answer IDs are not validated, so Intent Guide results that point to invalid answers in the RightNow CX knowledge base will still appear as links on the page.

Answer types that are not supported in Intent Guide include SQL, XML, action, JavaScript, and local URL. These answers will be stripped from the result set before being displayed.

To use Intent Guide, you’ll edit the Answers page (or the answers list page on the mobile implementation) to display Intent Guide search results. Instead of displaying individual answers on the answers/detail page, the customer portal displays them on the answers/intent page that is called when Intent Guide is used.

When Intent Guide is enabled and the standard Answers page is edited, the search results are displayed by the CombinedSearchResults widget and resemble the following figure.

The Intent Guide results may display a Similar Questions link. When customers click the link, a screen similar to the following figure appears.

Selecting an individual answer results in a display that resembles the following figure. This answer is displayed using the IntentGuideDisplay widget on the answers/intent.php page.

Adding Intent Guide functionality to standard pages

The following steps provide an overview of customer portal changes required to use Intent Guide

Step 1: Remove the AdvancedSearchDialog from the Support Home page. Since the search results from Intent Guide and the Community cannot use advanced search filters, we recommend removing them from the page to avoid confusion for your customers. The search field now appears without the Advanced Search link.

1. Open the home.php file in the /views/pages folder.
2. Delete the following line of code:

<rn:widget path=”search/AdvancedSearchDialog” report_page_url=”/app/answers/list” show_confirm_button_in_dialog=”true”/>

3. Save home.php.

Step 2: You may want to edit the CSS file to minimize the blank space above the search field after the Advanced Search link has been removed

1. Open the site.css file in the /euf/assets/themes/standard folder.
2. Locate the following code, which begins around line 409.

#rn_SearchControls form input[type=”submit”],
#rn_SearchControls form input[type=”image”] {
margin:1.3em 0 0 1.3em;
padding:.4em 1em;
}

3. Edit the code you located in step 2 so it matches the following.

#rn_SearchControls form input[type=”submit”],
#rn_SearchControls form input[type=”image”] {
margin:0 0 0 15px;
padding:7px 14px;
*padding: 4px 14px; /*IE6/7*/
}

4. Locate the following code, which begins around line 437.

#rn_SearchControls .rn_SearchInput label {
bottom:0px;
position:absolute;
/*IE6/7*/
*bottom:-50px !important;
*position:relative !important;
}

5. Edit the code you located in step 4 to remove the star-prefixed rules so the code matches the following.

#rn_SearchControls .rn_SearchInput label {
bottom:0px;
position:absolute;
}

6. Save site.css.

Step 3: Edit the Answers page to remove the AdvancedSearchDialog widget as you did on the Support Home page. Then you’ll replace the Multiline2 report widget, which displays standard search results, with the CombinedSearchResults widget, which displays results from Intent Guide, the knowledge base, and community posts. You’ll add an attribute to the ResultInfo2 attribute to display results from the combined search.

To edit the Answers page for Intent Guide:

1. Open the list.php file in the /views/pages/answers folder.
2. Delete the following line of code:

<rn:widget path=”search/AdvancedSearchDialog” show_confirm_button_in_dialog=”true”/>

3. Locate the following line of code:

<rn:widget path=”reports/Multiline2″/>

4. Replace the code you located in step 3 with the following:

<rn:widget path=”search/CombinedSearchResults”/>

5. To prevent the display of one or more types of results, perform one or more of the following actions.
a. To prevent the display of knowledge base answers, click here.
b. To prevent the display of Intent Guide results, add intent_guide_results=”0″ to the code you added in step 4.
c. To prevent the display of community posts, add social_results=”0″ to the code you added in step 4.

6. Locate the following line of code:

<rn:widget path=”reports/ResultInfo2″ add_params_to_url=”p,c”/>

7. Add the combined_results attribute to the ResultInfo2 code you located in step 6. If you want to display all the search results, set the attribute value to “all” as in the following code.

<rn:widget path=”reports/ResultInfo2″ add_params_to_url=”p,c” combined_results=”all”/>

8. Save list.php.

To prevent the display of knowledge base results:

Note: This procedure assumes you have already replaced the Multiline2 widget with the CombinedSearchResults widget as described in the steps before.

1. Open the list.php file in the /views/pages/answers folder.
2. Locate the following line of code.

<rn:widget path=”search/CombinedSearchResults”/>

3. Add the display_knowledgebase_results attribute to the code and set its value to false so your code looks like the following.

<rn:widget path=”search/CombinedSearchResults” display_knowledgebase_results=”false” />

4. Delete the following line of code.

<rn:widget path=”reports/Paginator”/>

5. Locate the following line of code.

<rn:widget path=”reports/ResultInfo2″ add_params_to_url=”p,c”/>

6. Add the display_knowledgebase_results attribute to the ResultInfo2 widget as you did to the CombinedSearchResults. Also add the label_results attribute to the code to change the Results label. (The default value is similar to “Results 1 – 10 of 45,” while this edited version displays “Results 1 – 10.”)

<rn:widget path=”reports/ResultInfo2″ add_params_to_url=”p,c” display_knowledgebase_results=”false” label_results=”Results %d – %d” />

7. Save list.php.

Dynamic Agent Desktop: Desktop workflows

When following elaborate business processes, staff members must often evaluate critical information and perform a variety of actions across multiple records. To help promote efficiency and reduce the chances for human error, RightNow CX lets you create highly customized desktop workflows that guide agents through complex customer interactions and data updates.

A desktop workflow is a sequence of workspaces, scripts, decisions, and actions – even other embedded workflows – that supports a business process. Using an intuitive design interface, you define a workflow by assembling a set of elements into a logical order to form a flow diagram, then adding decision logic to advance the flow.

Desktop workflow design canvas and ribbon

The workflow design ribbon includes three standard tabs (Home, Insert, and View) as well as two contextual tabs (Element Tools and Path Tools) that become visible when an element or connector is selected.

(Click to enlarge)
(Click to enlarge)

The Home tab gives you access to options that impact the entire desktop workflow. For example, you can select workflow elements, perform basic editing functions, add notes, and validate and preview the workflow.

The Insert tab allows you to add components to your flow diagram, either one at a time or in predefined workflow templates.

The View tab provides options for changing your view of the design canvas.

When you select an element or connector on the canvas, the ribbon displays a fourth contextual tab. When an element is selected, the Element Tools tab appears. This tab is divided into two sections. On the left are contextual groups and buttons, meaning they change depending on the element selected. On the right are standard groups and buttons, meaning they display no matter what element is selected.

Creating workflows

When designing a workflow, you can drag elements from the Home or Insert tab and order them on the canvas. The flow diagram is a graphical representation of the actions and decisions your workflow will perform and the order in which it will perform them. Your flow diagram can be as simple as a single path connecting a few workspaces or it can be complex, routing your staff members through dozens of workspaces, scripts, actions, and decisions.

Each element on the canvas displays an icon and two labels that help to identify its function. The top label contains the element’s name. The bottom label identifies the element’s working record. The icon varies by element type as well as the working record’s record type.

(Click to enlarge)
(Click to enlarge)

Elements vary by shape according to their functions.

  • User Interface: Rectangular elements used to denote items that display to staff members, such as workspaces, scripts, and other embedded workflows.
  • Automation: Circular elements used to denote automated events that run in the background, such as setting field values and creating and saving records.
  • Search: Polygonal elements that require staff members to perform a search, such as loading a record or associating a record with another record.
  • Decision: Diamond-shaped and polygonal elements that denote logical evaluations that are used to branch the flow across two or more paths based on conditions that you define.
(Click to enlarge)
(Click to enlarge)

Workflow templates

The Template button group on the Insert tab of the workflow designer provides several predefined templates as a starting point for creating your workflow’s flow diagram. You can add and remove elements to further customize your workflow and then edit each element’s attributes to meet your business needs.

  • New vs. Edit: This template directs staff members to one workspace if they are creating a new incident and to a different workspace if they are opening an existing incident.
  • Add Task: This template displays an incident in a workspace and then automatically creates a new task for the incident.
  • Copy Incident: This template displays an incident in a workspace, and then copies the incident, sets fields in the copy, and displays the copy in another workspace.
  • Create Contact: This template checks whether an open incident is associated with a contact record. If no contact is associated, it automatically creates a new contact for the incident and sets contact fields before displaying the incident in a workspace.
(Click to enlarge)
(Click to enlarge)

Exporting workflows

If you have a workflow that you want to copy to another RightNow CX interface, you can export the workflow and then import it on the other interface. Exported workflows contain all included workspaces (with all elements, fields, controls, layout, and rules), decisions, actions, and other embedded workflows. Alternately, you can export the contents of your canvas as an image file for use as a visual reference.

Dynamic Agent Desktop: Agent Scripts

Agent scripts add powerful functionality to workspaces and workflows, leading staff members through a series of pages to help them enter information in a logical progression. Script pages can contain most fields and controls available to workspaces, with the exception of relationship items.

They can also include questions and branching logic, similar to guides, so you can create wizards to guide staff members to different pages based on the information entered or actions taken on a previous page. Combining branching logic with page layout capabilities, agent scripting provides your staff with a methodical, efficient interface for capturing information and resolving issues.

To further extend the efficiency provided by scripts, you can add script rules. Like workspace rules, script rules are triggered by events and conditions to perform actions on script pages, such as setting the value of a field or calling a named event.

Before you can create or access agent scripts, you first need to update your profile to include scripting permission. Staff members with scripting permission included in their profile can create, copy, and delete scripts from the Scripts explorer, as well as add them to workspaces and workflows.

(Click to enlarge)
(Click to enlarge)

Listed next to each script’s name is its script type, based on the type of record it is used to update. The script type determines which fields and controls can be added to the script. RightNow CX provides the following standard script types: Answer, Chat, Contact, Incident, Opportunity, Organization, Task. In addition, you can create scripts for custom objects that have Object is Available in Workspaces, Scripting, and Workflow field visibility. Scripts are not available for use in quote, quote product, or multi-edit workspaces.

(Click to enlarge)
(Click to enlarge)

Creating and editing scripts

Scripts are created on a script designer consisting of a design space, a ribbon, and a page selector. You define a script by dragging and dropping fields and controls from the ribbon onto the design space and arranging them as you want them to appear on the script page.

(Click to enlarge)
(Click to enlarge)

When you create a new script page, the design space consists of three areas – a header and a footer shared by all pages, and a main area for content specific to the page. You can add fields and controls to any of these areas.

You can also right-click an item on the design space to access contextual menu options. The available options vary based on the item you right-click but generally include such actions as branching to a page, resetting tab indexes, or deleting the item.

If you delete a script that is used in a workspace, the workspace will still include the Script control. You will need to edit the workspace to remove the control or select a new script for the control.

If you save changes to a script that staff members might be using at the moment, it is a good idea to have them log out and then log back in to be sure your changes have been applied.

If your script has only one page, you cannot remove it. When you remove a page with other pages branching off it, those pages are also removed. When you remove an item used by a rule or branch, the rule or branch will likely be impacted, and you will need to edit or delete it. When you remove a branch used to access a page, the page is not removed. However, this can result in an orphaned page if the deleted branch provided the only path to the page.

Headers and footers can contain any of the fields or controls you can add to script pages. Unlike the content you add to other areas of a page, which is displayed only on that page, the content you add to the header and footer is shown on every page where the header and footer is displayed.

The navigation panel contains 4 buttons that let you navigate between pages in the script even if there are no branches to the pages. Some of the buttons can be used in the When condition in branches and script rules, so you can create your own functionality for these buttons.

Since these buttons are available in a single control, you can quickly add the buttons to any page you want. The page footer contains this control by default. The following buttons are included in the control.

  • Beginning: Click this button to return to the first page of the script.
  • Previous: Click this button to return to the previous page in the script.
  • Next: Click this button to proceed to the next page in the script. By default, this is the next page that is on the same tree level, shown on the page selector, as the current page. However, a branch can be created to load a different page when this button is clicked.
  • Exit/Finish: Click this button to trigger any rules or branches that include the Exit Script Event Fires or Finish Script Event Fires triggers. When you are on the last page of a script, the Exit button is renamed Finish. This button is not enabled unless a rule or branch is configured to use one of these conditions.

Adding branches to scripts

Scripts use branching logic for guiding agents to specific pages based on conditions you specify. You can also create branches that are triggered when different responses are selected from question controls, such as the Radio Question or Menu Question controls, or from the Next, Exit, and Finish buttons on the navigation panel.

You can create branches quickly by right-clicking fields and controls on the design space. You can also define more complex branches using the Add Branch window.

(Click to enlarge)
(Click to enlarge)

Script rules

You can create script rules to trigger actions on script pages when the conditions you specify are met. For example, you can create a rule that automatically sets the value of a field on a script page when a button on the page is clicked or when the page is opened. Script rules impact only the script pages the rules are created on.

However, using named events, you can use script rules in conjunction with workspace rules to trigger an action on a workspace. For example, a workspace rule that sets the incident workspace’s Status field to Solved can be triggered when a staff member clicks a button on a script page.

Script rules, workspace rules, and workflow connectors can be triggered by actions taken by staff members, such as changing a field value or saving a record. However, they can also be triggered by other rules using rule-defined events. Events are defined by adding event fire actions, which vary by event type.

  • Named Event: Named events are defined by adding the Fire a Named Event action to a script rule or workspace rule and specifying a name for the event.
  • Exit Script Event: Exit script events are defined by adding the Fire Exit Script Event action to a script rule.
  • Finish Script Event: Finish script events are defined by adding the Fire Finish Script Event action to a script rule.

Scripts can be exported as XML files and then imported to other interfaces.

Dynamic Agent Desktop: Guided Assistance

Guided assistance gives agents and customers the ability to locate answers or text explanations by selecting responses from question branches in guides. This lets agents quickly find information they can provide to customers when working with them on the phone, when responding to an incident, or when chatting. In addition, guides can be embedded in answers so customers can use them on the customer portal.

Configuring guided assistance

You can create as many guided assistance guides as you need to help your agents and customers locate appropriate responses to questions related to different topics. Each guide can include multiple question branches, so you can use a single guide to lead agents to answers regarding different models of a product or multiple service plans.

You first need to edit your profile to include permission to create guides. Staff members with appropriate profile permission can create, copy, delete, and rename guides from the Guided Assistance explorer.

(Click to enlarge)
(Click to enlarge)

Creating guides

If you attempt to delete a guide that is being used in another guide, a dependency warning will list each location where the guide is used and provide you with an option to cancel the deletion.

When creating a guide, you add questions to the guide, add text for the question responses, and associate answers or text explanations with each response. You can also insert existing guides into other guides if you have a set of common questions and answers you want to use in multiple guides.

(Click to enlarge)
(Click to enlarge)

The questions you add to guides can be simple or complex. If you think your agents may need additional context to better understand a question, you can add a web page or an image that will appear with the question text.

For a guide to be valid, all questions in the guide must be associated with responses, and all responses must be associated with other questions or with one or more public answers or text explanations.

Once a guide has been saved, you can click the Create Answer button on the ribbon to create an answer to associate with your guide.

A Call URL node is used to link a guide response to an absolute or relative URL. For instance, a customer-facing guide could lead customers to a solution that requires the involvement of support agents. In this case, you could add a Call URL node to route customers from the guide to your site’s Ask a Question page.

You can also pass parameters through the Call URL function by defining name-value pairs in the question or response properties. For example, when linking to the Ask a Question page, you can pass parameters to automatically set values for fields such as Product, Category, or a custom field. To accomplish this, you must first update the question name to indicate the name of the parameter you want to set. You can then edit the response properties to set the value you want.

Alternately, you can add name-value pairs to question properties to declare a static parameter. Static parameters are parameters that are carried through a guide’s remaining branches and are passed through any Call URL function that exists in the question’s sub hierarchy. To test Call URL functions and parameters, click the Preview button and select an option for previewing your guide.

Adding guided assistance to workspaces

Before your agents can use guides, you must add the Guided Assistance relationship item to a custom incident or chat workspace. Once added, the Guided Assistance relationship item functions as a container for displaying guides to your staff on the agent desktop.

Guides can be displayed manually, based on a guide search or selection performed by an agent. They can also be loaded dynamically, based on a workspace or script rule. Guides can also be embedded in answers so customers can use them on the customer portal.

Several design options are available for the guide searching feature. By default, the Guided Assistance Search report is used when performing searches, but you can select a different search report to use instead.

Also, as an alternative to displaying the default Search for a Guide and Select a Guide buttons, you can display the guide search fields inline at the top of the control. You can also choose to hide the left navigation page if you want to restrict agents from jumping freely to different sections of the guide.

In addition, when the Guided Assistance relationship item is added to incident workspaces, the Guided Assistance button is automatically displayed on the ribbon. By default, this button provides both select and search options for locating guides.

(Click to enlarge)
(Click to enlarge)

Because guide content (such as question text) is highly contextual and not wholly descriptive of a topic, it is not indexed for searching. However, answers associated with each guide are very relevant to searching, so the content of those answers is indexed. For this reason, when a search is performed, the results are based on the content of associated answers, not on the content of the guides themselves.

Therefore, in order for a guide to be searchable, you must associate it to an answer. And so that it can be searched for intuitively, the answer’s content must be relevant to the topic addressed by the guide. There are two ways to associate an answer to a guide.

  • Associate the answer to a guide response: When editing the Guided Assistance relationship item on a workspace, you can select a response on the guide and use the Associated Answer button to associate an answer to it. This creates a natural association because, in this case, the answer is part of a solution path defined by the guide.
  • Select a guide from the answer’s Guided Assistance field: A guide may not contain any responses that link to answers from the knowledge base (could be associated only with text explanations). In this case, to make the guide searchable, you must associate it with an answer using the Guided Assistance field in the answer editor. On the default answer workspace, the Guided Assistance field is located on the Details tab. Here, the answer is associated with a guide named Service Plan Assistance, and the guide will be returned in guide searches when the search criterion matches the answer’s contents.

Guided assistance functions are available as triggers and actions when configuring rules for incident and chat workspaces. For example, you can design a rule on an incident workspace that will open a guide based on the incident’s product or category.

Once you create a guide, you can export it to a guide definition file and import it into other RightNow CX interfaces to create a new guide. You can also extract a subset of the guide’s questions and responses to either create a new guide or save to a guide definition file that you can then import into another site.

Dynamic Agent Desktop: Workspace Rules

The efficiency provided by custom workspaces can be extended even further using workspace rules. Workspace rules are an automation layer used to set properties for different workspace items based on actions and conditions occurring in the workspace. Workspace rules are not available for multi-edit workspaces.

Workspace rules can save your agents a lot of time by simplifying or completely automating routine tasks. For example:

  • If your workspace contains a lot of fields and controls, you can use rules to show only the information that is relevant based on the type of interaction, the data being entered, or the identity of the contact or agent.
  • If a specific tab on the workspace correlates to a specific incident category, you could add a rule that focuses a specific tab based on the category value when the editor loads.
  • If agents are required to select from a certain subset of dispositions when solving incidents, you could create a workspace rule to make the Disposition field required and hide several of its items when incidents are set to Solved.
  • If incidents are escalated among groups based on product and profile, you could add a rule that sets the Assigned field to a specific group based on the product value selected and the profile of the logged-in staff member when a certain button control is clicked.

With workspace rules, you can dynamically adjust the display, behaviour, and values of fields and controls on a workspace based on staff member actions.

Each rule is triggered by one or more events and conditions you define, and can result in one or more actions, including the following:

  • Set the value of a field
  • Set the required status of a field
  • Make a field or control read-only
  • Show or hide a field or control
  • Show only a select group of menu items
  • Open a guided assistance guide
  • Open a specific script
  • Create a named event to trigger another workspace rule or a script rule

At a basic level, each rule defines a triggering event and a resulting action that will occur after the event is triggered.

There are two types of actions: Then and Else. Every rule has at least one Then action, which is the result of the triggering event and conditions. However, once conditions are specified for a rule, you can also add one or more Else actions. An Else action is triggered in cases where the rule’s conditions are not met.

Since business rules are checked after workspace rules, changes made to a record by workspace rules can be overridden by business rules if the rules have similar actions.

Rules are created using the Rule Wizard. The rule wizard is opened by clicking the Rules button on the ribbon.

(Click to enlarge)
(Click to enlarge)

Once you add rules, you can easily edit them, reorder them, or delete them once they are no longer needed. Rules are fired in the sequence in which they are listed. Adjusting them can impact how other rules affect the workspace.

Dynamic Agent Desktop: Workspaces

The dynamic agent desktop in RightNow CX is your staff members’ portal to your knowledge base. It is comprised of a set of complementary features. One of them is the Workspace, a configuration of the content pane, including the fields, controls, and ribbon that display when working with answers, contacts, incidents, opportunities, organizations, tasks, chat, etc.

Workspaces define the appearance of the agent desktop when staff members add, view, and edit records in RightNow CX. When you open a record the workspace determines the layout of fields, controls, and tabs on the content pane as well as the arrangement of buttons on the ribbon and the Quick Access toolbar.

The workspaces used by staff members are defined in their staff profile, with one workspace associated for each type of record the profile can access. Different profiles can use different workspaces. However, each editor within a profile must be set to use a specific workspace, so all staff who shares a profile will use the same set of workspaces.

Listed next to each workspace’s name is its workspace type, based on the type of record it opens. The workspace type determines which fields and controls can be added to the workspace.

Some workspace types are multi-edit, meaning they are used when staff members open multiple records of the same record type at the same time (up to 250 records can be edited at once).

(Click to enlarge)
(Click to enlarge)

Custom workspaces are used to provide your team with access to records stored in custom objects. Custom workspaces are created on a workspace designer consisting of a ribbon and a design space. You define a workspace by dragging and dropping fields and controls from the ribbon to the design space.

You can create a custom workspace from scratch by starting with a blank workspace. You can also copy an existing workspace or import a workspace from an exported workspace file to use as the basis for a new workspace. Then you can tailor the design by adding and removing fields and controls, adjusting properties, and arranging the layout to suit your business needs.

To create a custom workspace click new on the ribbon and in the Start With a Blank Workspace section, select a workspace type.

(Click to enlarge)
(Click to enlarge)

If you delete a workspace that is selected for a standard object editor in a profile, the profile will revert to the standard workspace for the editor type. If you delete a workspace that is selected for a custom object editor in a profile, the profile will revert to no workspace selection.

By default, most workspace types are blank on top with a single tab on the bottom. You can adjust the location of the tabbed area on the workspace. You can also adjust the space allotted to the two main areas of the workspace.

(Click to enlarge)
(Click to enlarge)

If you save changes to a workspace that staff members are using at the time, they will need to log out and then log back in to see the changes you have applied.

To save time when creating workspaces in multiple interfaces, RightNow CX lets you export a workspace as an XML file containing descriptions of all the workspace elements, including fields, controls, layout, and rules. The XML file can then be used by the import wizard to import the workspace to another interface.

Workspace notes are not included when exporting a workspace to an XML file. When a workspace is exported as an XML file, the file includes a hash value that will be used when the file is imported to determine if the file has been modified externally. If the file has been modified, it will not be available for importing, and an error message notifies you that the file is invalid.

If items from the workspace you are importing are not used by the workspace type you are converting it to, the next window lists these invalid items and informs you that they will be replaced by spacers, field placeholders, or removed from the imported workspace.

(Click to enlarge)
(Click to enlarge)

Customizable Menus: Answer statuses

An answer’s status controls whether it is public and describes its state in the knowledge base. RightNow Service provides 4 default answer statuses, described in the following list. Every answer status is associated with a status type that is either Public or Private.

  • Private: The Private answer status prevents answers from being displayed on the administration interface and the customer portal. It is associated with the Private status type.
  • Proposed: Answers with the Proposed status are incidents that agents have submitted as potential answers for the knowledge base. Proposed answers are associated with the Private status type.
  • Public: Answers with the Public status are visible on the customer portal. Public answers have a Public status type.
  • Review: The Review answer status means the answer should be evaluated to determine if it is still necessary. An answer’s status is set to Review when it has been part of the knowledge base for a specified amount of time or when it’s solved count reaches zero. Answers with a Review status are associated with a Private status type by default.

If you delete a custom answer status, all answers with that status are changed to have either a Public or Private status, depending on the status type of the deleted answer status. For example, if you delete a custom answer status with a Public status type, all answers that were associated with that status are changed to Public status with the Public answer status type.

(Click to enlarge)
(Click to enlarge)

Customizable Menus: Incident queues

Using incident rules, you can route unresolved incidents into different queues based on the criteria you define. For example, you might add queues for different product lines or service areas. Or you might have a first tier for basic customer service and additional tiers for problems of increasing complexity.

(Click to enlarge)
(Click to enlarge)

When you create profiles for staff accounts, you can assign one or more queues to each profile and specify how incidents are pulled from that queue. Based on their profile, agents can retrieve a specified number of incidents from the queues to which they have access.

(Click to enlarge)
(Click to enlarge)

Queues also help you manage incident escalation to meet your organization’s SLAs, balance agent workload, and track agent productivity and efficiency.

The following steps provide an overview for managing queues:

  • Add queues
  • Assign queues to profiles
  • Create business rules to populate queues
  • Instruct agents about queues
  • Monitor queues

When you add an incident queue, you can define whether the queue uses a round-robin incident assignment and specify the queue as the default queue where unassigned incidents are routed. You can also delete queues from the Incident Queues editor. Before you can delete the incident queue, you must first edit the rules so they no longer use the queue.

Queue Type has the following options: Standard, Round Robin (All), or Round Robin (Logged In). A round-robin queue automatically assigns incidents in this queue to agents in a rotating fashion. If you select Round Robin (All), incidents are assigned to all staff members whose profile includes the queue, even if they are not logged in.