Facebook service is not a bolt-on, it is native

According to a recent report from Infosys, titled “Rethinking Retail”, consumers engage with retailers on Facebook (38%) more than they do via that retailer’s website (36%). This difference obviously increases when it comes to younger consumers. And 9 out of 10 consumers say that the social media engagement with the brand impacts how much they spend. The report also says that the main reason (38%) for retailers not being able to create a more integrated CX is the lack of technology.

RightNow CX combines Web, Contact Centre and Social Experience. The Social Experience enables companies to manage social interactions as a fully integrated part of the Customer Experience. It was designed to extend the Customer Experience to the places where consumers are learning, sharing, and buying – the Social Media. And one of the Social Experience services of RightNow CX is Self Service for Facebook, specifically created for the biggest Social Network (c. 1.5 billion users).

Back in July 2013 I published 2 posts about this topic so I will not repeat it here. I will leave you the links and invite you to read/watch.

But this is not all. Oracle has been improving this service and in the next few releases it will give companies full control over the Support page on Facebook – allowing the developers to change the look and feel by accessing PHP – as well as add the Virtual Assistant (already available in the Customer Portal) to the Support pages on Facebook.

This is why and where RightNow CX differentiates from its competitors. While some are trying to bolt-on some applications that will bring them the desired functionalities, RightNow CX was designed from the beginning to be a complete solution that enables companies to deliver a fully integrated Customer Experience across all channels.

Self Service for Facebook: Configuration

To enable Self Service for Facebook, it is necessary to configure its settings in both Facebook and RightNow.

To enable RightNow Self Service for Facebook

1. In a web browser, go to http://facebook.com/developers

2. Log in using your Facebook account.

Note: The configuration of your Self Service for Facebook application is tied to the Facebook account used to configure it. For this reason, you should use an account that has been created specifically to administer the application. This can prevent problems if the staff member who configured the account transfers to another position or leaves your organization.

3. If prompted, click the Allow button to allow the Developer application permission to access your Facebook profile information.

Note: The Developer application is the property of Facebook and its use is subject to Facebook’s terms and conditions. Depending on the state of your Facebook account, you may be prompted to confirm your account information in order to add applications.

4. Click “Apps”.

5. Click the “+ Create New App” button.

6. Type a name for your application in the “App Name” field and click the “Continue” button.

7. Enter the confirmation text in the Security Check form and click the “Continue” button. The browser refreshes to display the basic settings of your application.

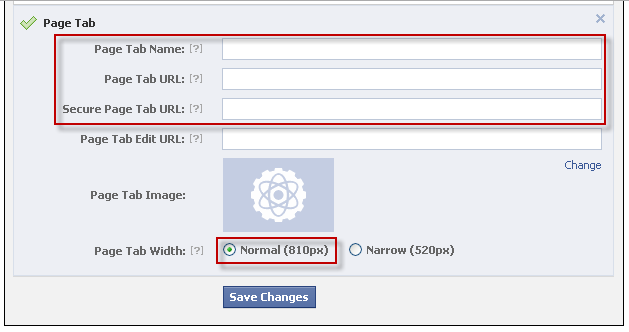
8. Click to expand the Website with Facebook Login, App on Facebook, and Page Tab sections, and enter the following information in the fields highlighted in the example screenshot below.

rnfb3

rnfb4

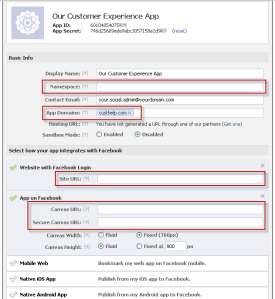
Namespace: Type the name for the Facebook canvas page that will display your application. We recommend using the following convention: rncx-<organization_name>

App Domains: Type the domain used in your site URL. This ensures that Facebook can authenticate to related subdomains. The domain used for RightNow CX sites is custhelp.com.

Site URL: Type the base URL for your Oracle RightNow CX site in the following format: http:// < your_rightnow_site >.custhelp.com/

Canvas URL: Type the URL for the Self Service for Facebook application in the following format: http:// < your_rightnow_site >.custhelp.com/cx/facebook/

Secure Canvas URL: Type the secure URL for the Self Service for Facebook application in the following format: https:// < your_rightnow_site >.custhelp.com/cx/facebook/

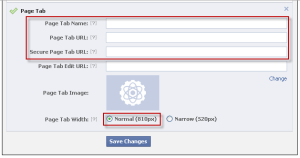
Page Tab Name: Type a label for the button or tab that customers will click on your Facebook page to display the Self Service for Facebook application.

Tip: Because Facebook displays only the first 16 characters of this value on the app button, we recommend using a simple name such as Customer Care. Since this button appears on your branded Facebook page, it is not necessary to add your brand name to the tab.

Page Tab URL: Type the application home page URL, in the following format: http:// < your_rightnow_site >.custhelp.com/cx/facebook/home/

Secure Page Tab URL: Type the application home page secure URL, in the following format: https:// < your_rightnow_site >.custhelp.com/cx/facebook/home/

Page Tab Width: If using Facebook’s Timeline layout, select Normal (810px).  If using Facebook’s legacy layout, select Narrow (520px).

9. Click the “Save Changes” button. Facebook begins propagating your Self Service for Facebook application across its servers and the page refreshes to display a summary of your application settings

Note: To edit these settings in the future, log in to http://www.facebook.com/developers, click “Apps”, click the application name under “Recently Viewed”, and click “Edit App”.

10. Write down the App ID and App Secret values that appear at the top of the page for later reference. You will enter these values in Oracle RightNow CX to authenticate Facebook and provide access to data from the knowledge base and community. Refer to the configuration steps below for how to configure the application in Oracle RightNow CX.

Note: Facebook may take several minutes to complete the processing of your application before it will be available at the canvas URL. However, the application will not be enabled until it has been configured in Oracle RightNow CX. Refer to the following procedure for configuring your application in Oracle RightNow CX.

To configure your application in Oracle RightNow CX

1. Log in to Oracle RightNow CX.

2. Click the “Configuration” button on the navigation pane.

3. Double-click “Configuration Settings” under “Site Configuration”.

4. Customize the following configuration settings.

a) Set FACEBOOK_ENABLED to Yes.

b) Set FACEBOOK_APPLICATION_ID to the App ID value of the Facebook application.

c) Set FACEBOOK_APPLICATION_SECRET to the App Secret value of the Facebook application.

Note: To obtain the App ID and App Secret values, refer to your notes from the end of the previous procedure or log into http://www.facebook.com/developers and click the application name.

5. To enable community features, edit the remaining FACEBOOK_* settings to enable the features you want Self Service for Facebook to provide.

Note: For information about any of these settings, click the setting and refer to the description that appears in the Configuration Editor, and consult the RightNow documentation.

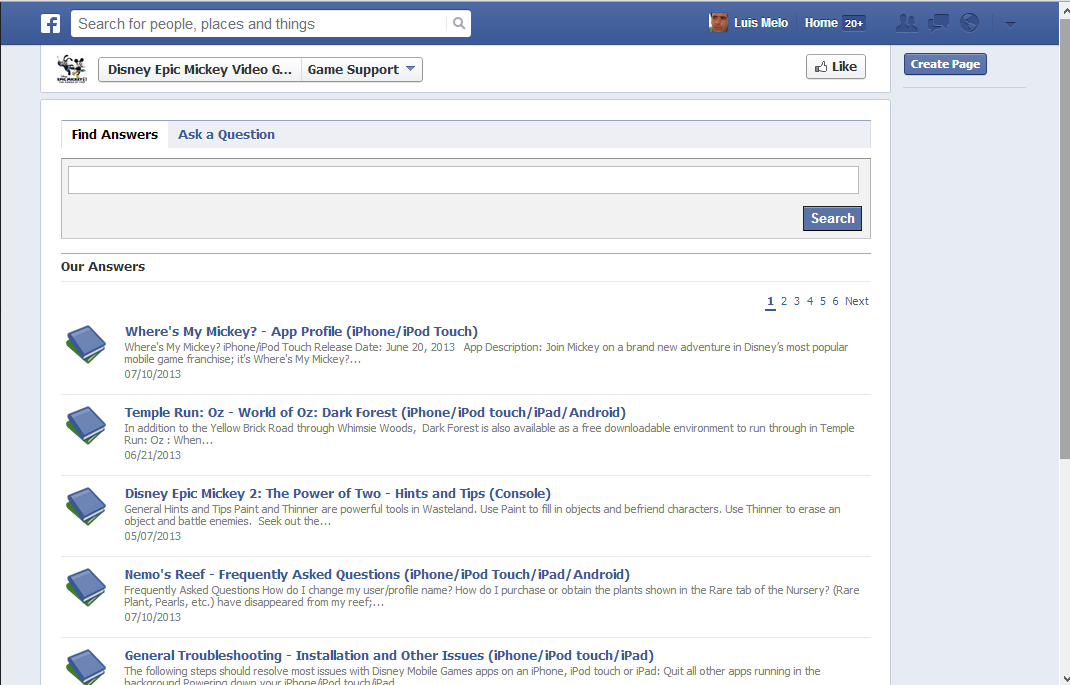
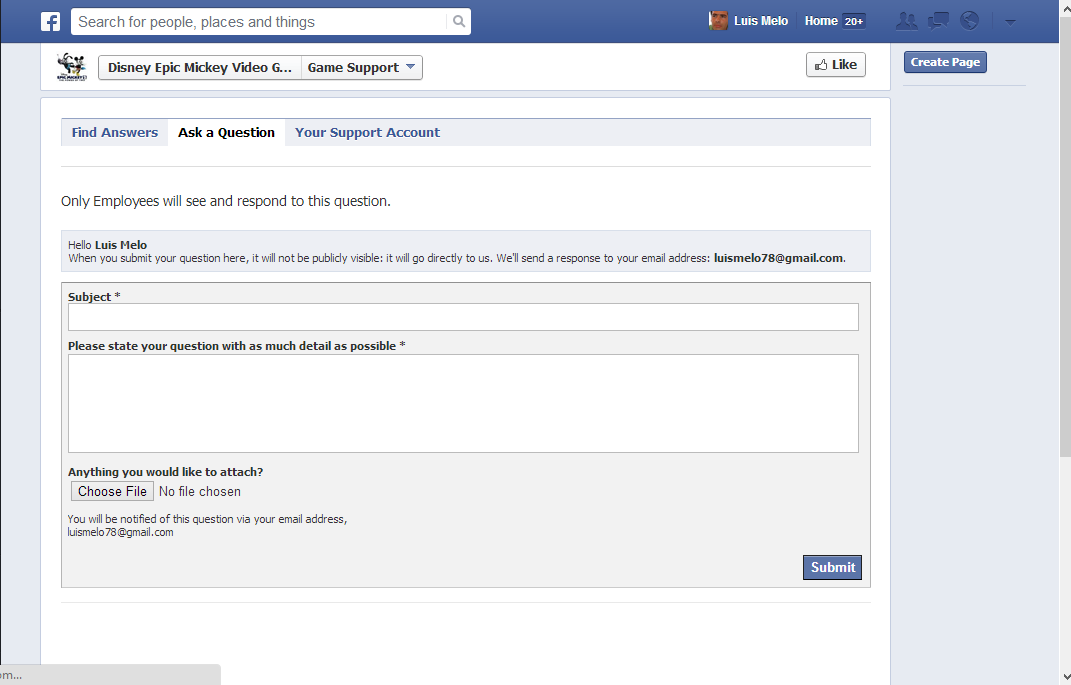
6. Once enabled, the application is available at the canvas page:
http://apps.facebook.com/<Namespace>/

To add the application to your organization’s fan page

1. Navigate to the following URL:
http://www.facebook.com/dialog/pagetab?app_id=APP_ID&next=PAGE_TAB_URL
where the APP_ID and PAGE_TAB_URL can be found in the Facebook app development settings.

Example: http://www.facebook.com/dialog/pagetab?app_id=198170093600717&next=http://sitename.custhelp.com/cx/facebook/home/

2. Click the “Choose Facebook Pages” button and select the page you want to add your app to.

3. Click the “Add Page Tab” button. The application should now be accessible from your Facebook page.

Self Service for Facebook

In the age of the social web, organizations can no longer dictate when, where, and how they interact with customers. They must engage customers in their channels of choice. Facebook is without a doubt the most popular social network in the world, with over 1 billion active users.

RightNow Self Service for Facebook is a special Facebook application served by RightNow that provides access to features from Oracle RightNow CX Cloud Service right from a Facebook page, in both its standard and mobile web interfaces.

Using Self Service for Facebook, customers can:

  • Search the RightNow knowledge base, including results from community and natural language search using RightNow Intent Guide, if enabled.
  • Submit questions privately to the support team or publicly to the community.
  • Rate and comment on answers.
  • Browse community discussions.
  • Submit and track community posts and comments.
  • Share service and community experiences on Facebook.

Agents can field and respond to Facebook incidents right from the agent desktop. This way, customers can receive the same exceptional support they receive from other service channels without having to leave Facebook.

As a result, organizations can deliver a consistent experience to customers and fans on Facebook while maintaining a unified view of customer interactions across all service channels.

Features

Self Service for Facebook helps customers find the information they need by browsing or searching the knowledge base from the Facebook social networking site. Once connected, the “Find Answers” tab displayed in Facebook presents the same answers that are visible in the answer search report defined for the customer portal. The report will also include results from your community and Intent Guide, if enabled.

rnfb1

Similar to visiting the customer portal, customers can click an answer to view its contents, including guides, without leaving Facebook. They can also click the “Ask a Question” tab to submit questions. Incidents submitted in this manner are processed by the system just like incidents submitted through the customer portal, and can then be accessed by staff using the agent desktop.

rnfb2

Facebook accounts will be associated with existing contacts that share the same email address (whether primary or alternate). In a case where no matching contact is found, a new contact will be created and automatically associated using the email address from the Facebook account. Agent responses to incidents submitted through Facebook are sent by email to that address.

Customers can also click the “Your Support Account” tab to view and update incidents from their recent support history.

Incidents created through Self Service for Facebook will be processed through whatever business rules and escalation paths configured for the site. If a SmartAssistant rule is active, suggested answers will be displayed when questions are submitted, just as they are in the customer portal.

To route these incidents through a distinct set of rule actions, use “Incident.Channel equals Facebook” as a business rule condition.

Self Service for Facebook is a component of RightNow application that can be embedded in a Facebook fan page. It has three types of service:

  • Self-assisted Service: Customers can search and access the same answer content available in your knowledge base, and (when using RightNow Community) provide feedback on your content by commenting on and rating answers.
  • Crowd-assisted Service: Customers can share their service experiences with Facebook friends and search and participate in RightNow Community discussions.
  • Agent-assisted Service: Customers can submit questions to your Oracle RightNow CX application directly from your Facebook page, as well as view and update questions they have submitted.

Self Service for Facebook also provides single sign-on capabilities, allowing customers to link their RightNow contact records to their Facebook accounts. When enabled, customers can use Self Service for Facebook to log into their RightNow account using their Facebook account credentials.

Social Channels on Message Thread

Recently, when setting up the Social Channels in a new environment, I came across a distress: I was not able to respond through the same Social channel.

I reviewed my steps:

  1. I had configured the Cloud Monitor correctly;
  2. I had created and set up Facebook Channel correctly;
  3. I had created and set up Twitter Channel correctly;
  4. I was able to monitor both Social channels;
  5. I was able to create an incident in order to respond to a tweet/post.

But on the message thread of the incident created from the post/tweet, I was not able to see the social channel option when I clicked the channel drop down list. I could only see the standard options: Phone, Fax, Post, Email, CSS Web or No Channel.

cm0

The problem was that when I clicked “Respond” or “Create Incident” on the Cloud Monitor, an Incident was being created and the default message type in the message thread was “Customer Entry” (where I could only see the channels: Phone, Fax, Post, Email, CSS Web or No Channel).

cm1

But if I changed the message type to “Response” – by clicking “Add” > “Reponse”…

cm2

… I was now able to see the Twitter (or Facebook) channel (if the Contact associated with the Incident had a Twitter or Facebook channel username).

cm3

It seemed to me that, whenever I created an incident, it was logical to be able to have the message type default to “Response” instead of “Customer Entry”. And this can be done by editing the Incident workspace:

  • Open the Incident workspace
  • Go to the “Messages” tab
  • Select the messages control (aka “Rich Text Incident Thread”)
  • Go to the “Design” tab > “Options” section
  • Click “Default Thread” > “Default Thread on New/Edit” and select “Response”

cm4

Now, whenever I create an incident, the default message type is “Response” and I can straightaway see the available channels through which I can respond.

Thank you to Hari Menon (Oracle Product Manager) and Luke Brennan (Oracle Pre-Sales Consultant) for the support.

Follow “Doctor CX” on Facebook

Whenever a new post is written I normally go through the Social Networks to let you know that something new is published.

I know some of you – the ones that are registered on WordPress – follow the blog in order to be notified on any new post.

But those with WordPress accounts are just a minority amongst the thousands that fortunately come to try to find help.

So I thought it was time to find an easier way for you to follow and be aware of what is going on and being published.

Therefore I created a Facebook page where a simple “Like” will enable you to always be up to date.

Visit and Like us here or there 

Cloud Monitor: Responding through social channels

Using the cloud monitor, you can add social media posts from Facebook, Twitter, and RightNow Community to new or existing incidents so they can be processed on the agent desktop.

You cannot respond to RSS feeds or YouTube posts through RightNow CX. However, you can create incidents from them, which can be helpful for other business purposes.

When you create an incident from a social channel, the content of the post is added as a customer thread entry. By default, the incident’s subject field will contain the name of the channel and the leading text of the post. Together exceeding no more than 240 characters. However, you can customize the subject field contents by editing the CLOUD_INC_SUBJECT_TEXT setting.

The method used to associate incoming social incidents with contacts varies by channel. Incidents created from a post in RightNow Community are associated with contacts based on contact email address. Incidents created from Facebook, Twitter, and YouTube posts are associated with a contact based on social media user name. If no matching contact is found, a new contact record is created and associated with the incident. Incidents created from RSS Feed or YouTube will be associated with a common generic contact.

The way you respond to social incidents also varies by channel. RightNow CX tracks each incident’s originating channel in the incidents.channel_id field and selects the same channel by default when you send a response. Each response is posted back to the contact using the unique messaging conventions of the originating media service.

Responding to Facebook posts
In Facebook, social conversations take the form of posts and comments on pages. While the cloud monitor allows you to monitor (but not respond to) posts from the public Facebook feed, you can respond to incidents created from customer posts on your organization’s Facebook fan page.

When you respond to a post on your organization’s Facebook page, the response appears as a comment beneath the post. The post is attributed to the name of the Facebook page designated by the channel account, rather than the agent’s name.

To respond to a Facebook post:
1. Perform a cloud search on a custom Facebook channel and view your search results
2. From the open cloud search report, select the post you want to create an incident from in the search results list.
3. Click the Respond button on the ribbon. A new incident opens on the content pane containing the details of the post
4. Select the Send On Save check box. The incident thread expands to reveal Facebook channel response options. The thread displays the name of the post’s originating channel and automatically selects the same channel for the response. The default channel account associated with the responding agent is also displayed
5. If your site has more than one Facebook channel account, click the Respond As dropdown menu in the header of the response thread.
6. Fill in any remaining details for the incident.
7. Click the Save and Close button on the ribbon.

Responding to Twitter posts
RightNow CX can create incidents automatically from private Twitter messages when you select the Automatically Create Incident option in the Twitter channel accounts editor.

To respond to a Twitter post:
1. Perform a cloud search on a Twitter channel and view your search results.
2. From the open cloud search report, select the post you want to create an incident from in the search results list.
3. Click the Respond button on the ribbon. A new incident opens on the content pane containing the details of the post
4. Select the Send on Save check box. The response thread header expands to reveal Twitter channel response options.
5. If your site has more than one Twitter channel account, click the Respond As drop-down menu and select the account you want to respond from.

Important: The channel account you respond from must include Private Message Response permissions. If the customer’s Twitter account is following your organization’s Twitter account, the Send Private check box will be visible and selected by default. You can clear this check box to post the message to the public feed. If the customer’s account is not following your organization’s account, the Send Private check box will not be shown and all sent messages will be public.

6. If your organization’s Twitter account is not yet following your customer’s Twitter account, click the Follow button.
7. Type your response in the response thread. Remember to limit each response to 140 characters, the maximum number allowed by Twitter.
8. Fill in any remaining details for the incident.
9. Click the Save and Close button on the ribbon to send the response through Twitter.

Cloud Monitor: Configuration and Overview

Configuration
Before you can monitor the social cloud to search for information related to your organization, you need to configure your application to provide access to the RightNow Cloud Monitor.

To provide access to the RightNow Cloud Monitor it is necessary to:

  • Add cloud monitor to Navigation Sets
  • Add cloud monitor permission to Profiles

cm6

cm7

Overview
Using the cloud monitor, you can add, execute, and analyse cloud searches for any of the available social channels. As each new cloud search is added, it is listed on the content pane along with information about who added it, what social channel is searched, what text is searched for, the time it was last executed, and how many results have been returned. A search can also be designated as a favourite, which prevents it from being deleted and enables it to be scheduled on a recurring basis.

Twitter, Facebook, RightNow Community, and RSS searches can return a maximum of 100 new results per search instance, while YouTube searches are limited to 50 new results.

The social channels available for cloud searches are configured through the Channels editor. In addition, the Channels editor provides a utility for viewing and managing cloud searches that have been added for each channel. With the Cloud Search Manager, you can view and manage the list of agents who have selected each search as a favourite as well as remove searches that were entered incorrectly or are no longer needed.

The Cloud Monitor dashboard is divided into 3 sections.

  • Favourites: Contains a list of previous cloud searches. Each time you perform a new cloud search, it is automatically marked as a favourite and added to this section.
  • Subscriptions: Contains a list of cloud searches that have been added on a subscription basis. Refer to Searching the social cloud.
  • Private Messages: Contains messages received through Twitter private messages. Refer to Responding to Twitter posts.

cm8

Cloud Monitor: Facebook Channels

Cloud Monitor allows your company to monitor and participate in conversations on the Social Networks, interacting with the customers through Facebook, Twitter and listening on YouTube, Blogs or other RSS Feeds. From the searches in the Cloud Monitor agents can create incidents to pro-actively communicate with customers and follow up customers’s issues and also identify trends or experiences.

Social Channels have to be set up in order for RightNow to be able to search the Social Networks for posts and comments related to your organization and its products/services. These channels include Facebook, Twitter, YouTube, and RSS feeds.

Facebook
RightNow CX provides a default Facebook channel that you can access through the social monitor to perform searches of Facebook’s public feed. In addition, you can add custom channels to focus your searches to specific Facebook pages. By adding a custom Facebook channel, you can perform cloud searches that are confined to the posts on your organization’s
Facebook page.

To add a custom Facebook channel:
1. Click the Configuration button on the navigation pane.
2. Double-click Channels under Service in the configuration list. The Channels tree displays.
3. Click Facebook and then click the New button on the ribbon to display the editor.
4. Type a name for the custom channel in the Name field.
5. Click the Grant Access button. The Facebook Login window displays.
6. Type the email address and password for the Facebook account associated with the page.
7. Click the Log In button to sync the account with the channel you are creating.
8. Enter the necessary field information (Fan Page, Fan Page Id, etc).

cm1

Note: Once the channel is saved and has been used to perform cloud searches, the Search Manager button on the Channels editor ribbon will become active. This function provides access to a utility for managing cloud searches by channel

cm3

If you want your staff to be able to interact with customers on Facebook, you can also define a channel account to permit specific staff members to monitor your Facebook pages and send responses (Note: when agents reply to Facebook posts, their replies appear to come from the fan page and not from individual persona).

To provide staff access to a Facebook channel account:
1. Click the Configuration button on the navigation pane.
2. Double-click Channel Accounts under Service. The Channel Accounts tree display.
3. Click the arrow next to a Facebook custom channel to expand it and then click its contained channel account to display it on the editor.
4. Type a name for the Facebook channel account in the Name field
5. Select a group check box to associate all staff members in the group with the channel account or expand the group to select staff members individually.

cm2