Message Templates: Customize and Deploy Global Template

One of RightNow’s major new features on the November 2012 release was the Message Templates for notifications and emails. These are used to customize administrator notifications, administrator emails and contact emails. The messages are designed to support a broad range of business cases across a variety of implementations to communicate with staff as well as with contacts. Message templates let you quickly apply your organization’s brand across all of your messages and personalize message content to your target audience.

Message templates let you customize your administrator notifications, administrator emails, and contact emails for each interface. You can customize your message content, enable and disable notifications and emails, as well as define the message format as HTML or text. Message templates also let you quickly apply your organization’s brand across all notifications and emails, including RightNow CX service email.

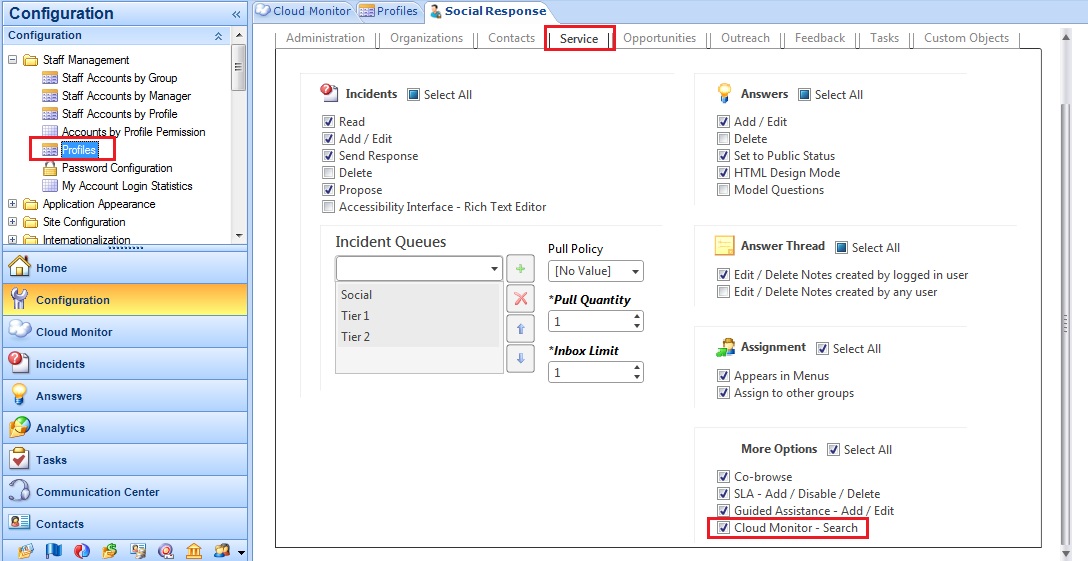
Important Note: Staff members must have the Message Templates permission on the Administration tab of the Profiles editor in order to customize message templates.

mt1

The Message Templates editor contains the global template and a set of system-generated messages. Using an HTML editor you can edit the global template and the messages directly on the CX Console.

The global template contains the content that frames the message-specific content in each of your individual messages. Think of the global template as a wrapper for your entire set of notifications and emails. Using the HTML editor, you can standardize the design of your outgoing messages giving them all the same look and feel.

When you are ready to deploy your global template, your brand can be applied to a single message or across all of your messages.

mt2

The system-generated messages are sent to staff and contacts to support activities and events occurring throughout the system. Using an HTML editor, you can insert links that appear as clickable text and use merge fields to customize each message. The tools that display on the HTML editor are context-sensitive and are the logical tools you would use for the specific message you are customizing.

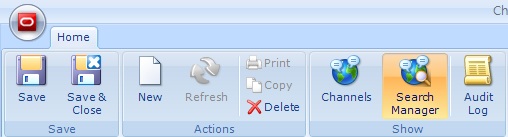
The message templates ribbon contains buttons for accessing the individual system-generated messages and for working with the global template, including viewing the live global template and editing and deploying the global template.

mt3

  • Show: The buttons in this group let you toggle between the different message types that are available.
  • Global Template: The buttons in this group apply to the global template that is used to apply a standard look and feel across all of your messages.

Customizing the Global Template

The global template contains the content that frames the message-specific content in each of your individual messages. You can standardize the look of your messages by inserting your own logo. You can also customize your headers and footers to display information that needs to be communicated in all of your messages.

In the middle of the global template’s HTML editor are two placeholders – one is an image placeholder and the other is a placeholder for the message-specific content. You can insert HTML above and below the placeholders. The global template, like all messages, is interface-specific.

mt4

Important Note: Since the system default global template cannot be restored from the Message Templates editor, we recommend that you copy and paste the original template’s HTML into a text file, such as Notepad, in case you need it at a later time. You can do this from the Source tab on the HTML editor.

To edit the global template:

1. Click the Configuration button on the navigation pane.
2. Double-click Message Templates under Site Configuration.
3. Select the interface you want to customize.
4. Click the Edit Template button on the ribbon.
5. To insert your logo or another image, double-click the image placeholder to the right of the content placeholder. The Image Editor window opens.
6. To edit the global template using the hyperlinks, buttons, dynamic content, and other features available on the HTML editor.
7. To customize your header and footer content, type above or below the placeholders.
8. To discard your pending changes and revert to the most recently saved global template, click the Refresh button.
9. To see the currently deployed template, click the View Live Template button. The content pane refreshes to display the version of the global template that is currently applied to all notifications and messages.
10. To spell check the global template, click the Spelling button on the ribbon.
11. To preview your changes to the global template, click the Preview tab at the bottom of the HTML editor.
12. Click the Save button to save your edits to the global template

At this point, your edits have not been deployed or committed to the database. Deploying the global template is necessary.

Deploying the global template

When you deploy the global template, you copy the version you are currently editing to the version that is sent throughout the system to the entire set of messages. Once you deploy, you still have the option to make changes to your global template because you have not committed anything to the database. It is also true at this point that you can no longer view the active version of the global template. Once you save, your deployed version is the only one you can see.

To make your deployed version active, you must commit your changes to the database by saving after you deploy. It is only after you have saved your deployment that your global template changes are active and are also applied to the entire set of active messages.

mt5

To deploy the global template:

1. After saving changes to the global template, click the Deploy Template button. A message asks you to confirm your decision to deploy.
2. Click the OK button. Your deployed version is copied to the version that is sent throughout the system
3. Click the Save button on the ribbon to commit your deployed version to the database.

Now, your deployed version is your active global template and is applied to your entire set of active messages.

To deploy the global template and the messages at the same time:

1. After saving changes to the global template, click the Deploy All button. A message asks you to confirm your decision to deploy the global template as well as all of your messages.
2. Click the OK button. Your deployed version is copied to the version that is sent throughout the system and all of your messages are labelled, “Pending…” under the description of the message. However, neither your deployed global template nor your messages are active at this point.
3. Click the Save button on the ribbon to commit your deployed version and all of your messages to the database.

Now, your deployed version is your active global template and is applied to your entire set of messages. Your deployed messages are also active.

Connect Web Services for SOAP: Create a Contact

After retrieving the WSDL and be aware of the API Operations you are ready to get, create, update and delete RightNow records through Web Services.

In this post an example will be presented on how to create a Contact. On the documentation available (Connect Web Services for SOAP) we can see the sample code and then adapt to our case.

To create a Contact we shall use the “Create” API Operation. The request message shall have:

  • An Envelope;
  • A Header;
  • A Body;

Envelope

<soapenv:Envelope xmlns:soapenv=http://schemas.xmlsoap.org/soap/envelope/&#8221; xmlns:v1=“urn:messages.ws.rightnow.com/v1_2” xmlns:v11=“urn:base.ws.rightnow.com/v1_2”>
[Include here the Header and the Body]
</soapenv:Envelope>

Header

Notice the AppID tag with the Operation name “Basic Create”

<soapenv:Header>
  <ns7:ClientInfoHeader xmlns:ns7=“urn:messages.ws.rightnow.com/v1_2” soapenv:mustUnderstand=“0”>
     <ns7:AppID>Basic Create</ns7:AppID>
  </ns7:ClientInfoHeader>
  <wsse:Security xmlns:wsse=http://docs.oasis-open.org/wss/2004/01/oasis-200401-wss-wssecurity-secext-1.0.xsd&#8221; mustUnderstand=“1”>
     <wsse:UsernameToken>
        <wsse:Username>Username</wsse:Username>
        <wsse:Password Type=http://docs.oasis-open.org/wss/2004/01/oasis-200401-wss-username-token-profile-1.0#PasswordText&#8221;>Password</wsse:Password>
     </wsse:UsernameToken>
  </wsse:Security>
</soapenv:Header>

Body

Notice the Create tag and the RNObjects tag with the xsi:type = “Contact”

<soapenv:Body>
<ns7:Create xmlns:ns7=“urn:messages.ws.rightnow.com/v1_2”>
——<ns7:RNObjects xmlns:ns4=“urn:objects.ws.rightnow.com/v1_2” xmlns:xsi=http://www.w3.org/2001/XMLSchema-instance&#8221; xsi:type=“ns4:Contact”>
———<ns4:Emails>
————<ns4:EmailList action=“add”>
—————<ns4:Address>example.email@rightnow.com</ns4:Address>
—————<ns4:AddressType>
——————<ID xmlns=“urn:base.ws.rightnow.com/v1_2” id=“0” />
—————</ns4:AddressType>
————</ns4:EmailList>
———</ns4:Emails>
———<ns4:Name>
————<ns4:First>FirstName</ns4:First>
————<ns4:Last>LastName</ns4:Last>
———</ns4:Name>
——</ns7:RNObjects>
</ns7:Create>
</soapenv:Body>

Connect Web Services for SOAP: API Operations

Operations represent specific calls invoked to perform specific tasks on the RightNow CX platform. Connect Web Services defines a number of operations which either accept or return one or more instances of RNObject.

CRUD – Create, Read, Update and Destroy

CRUD operations allow for the creation, reading, updating and deleting of objects contained in the RightNow CX system.

Return values:

  • Create and Get (Read) operations return a list containing 1 to N RNObjects.
  • Update and Destroy operations do not return a value upon success.
  • If a CRUD operation fails, a SOAP fault is returned.

API Operations

Listed bellow are the supported operations in Connect Web Services (that are included in the WSDL).

  • Batch: Sends a set of operations to the server in a single request.
  • ConvertGenericToObject: Converts a generic object to a typed object.
  • ConvertObjectToGeneric: Converts a typed object to a generic object.
  • Create: Creates one or more instances of objects which inherit from RNObject.
  • Destroy: Destroys one or more instances of objects which inherit from RNObject.
  • ExecuteMarketingFlow: Initiates a marketing campaign flow.
  • Get: Reads one ore more instances of objects which inherit from RNObject.
  • GetFileData: Obtains the binary data for a file attachment.
  • GetMetaData: Obtains all meta-data information for all classes.
  • GetMetaDataForClass: Obtains meta-data information for the specified class.
  • GetMetaDataLastChangeTime: Obtains the date and time of the last change to the meta-data.
  • GetValuesForNamedID: Obtains a list of ID-Name pairs for a specific NamedID field.
  • GetValuesForNamedIDHierarchy: Obtains a list of ID-Name pairs for a specific NamedIDHierarchy field.
  • QueryCSV: Processes a ROQL query string and returns data in a CSV result.
  • QueryObjects: Processes a ROQL query string and returns one or more objects.
  • ResetContactPassword: Invalidates a contacts password and emails a link to the contact that can be used to reset the password.
  • RunAnalyticsReport: Executes a RightNow Analytics report reurnning the data in a CSV result.
  • SendMailingToContact: Sends a transactional mailing to a contact.
  • Update: Updates one or more instance of objects which inherit from RNObject.

Connect Web Services for SOAP: WSDL Retrieval

Connect Web Services for SOAP is an open and standards-based integration API enabling developers to build integration solutions with RightNow CX that leverage industry leading standards such as WSDL 1.1 and SOAP 1.1.

Connect Web Services for SOAP is RightNow’s leading data integration API, providing broad out-of-the-box tooling support for a wide variety of languages, platforms, and tools.

Connect Web Services should be used to extend the functionality offered by RightNow CX and the ability to access data stored in the RightNow CX platform.

WSDL Retrieval

There are two WSDL files that provide access to Connect Web Services:

  • Standard WSDL – This WSDL should be used by application developers building integrations specific to their Oracle RightNow CX instance. The typed WSDL is a strongly typed representation of the Connect Common Object Model. The strongly typed WSDL can be accessed from the following URL:

http://<host_name>/cgi-bin/<interface>.cfg/services/soap?wsdl=typed

  • Partner WSDL – This WSDL should be used by application developers building integrations that function across multiple instances of Oracle RightNow CX. It provides the ability to work with Generic Objects that can be used across multiple instances of Oracle RightNow CX. The generic WSDL can be accessed from the following URL:

http://<host_name>/cgi-bin/<interface>.cfg/services/soap?wsdl=generic

(e.g. host name: interfacename.rightnowdemo.com)
(e.g. interface: interfacename)

Analytics: Dashboards

When viewing standard or custom reports, you generally open reports one at a time, and search for data in only the report that is active. However, you can view and search for data in several reports simultaneously by adding them to a dashboard. Each report in a dashboard retains the same functionality as if you opened the report separately, allowing you to access and work with a variety of data from one dashboard.

Dashboards are particularly useful for managers who need to view a wide range of data from different reports. Using dashboards eliminates the need to open a large number of reports individually. Using dashboards eliminates the need to open a large number of reports individually.

Dashboards are created and edited on the dashboard design centre by dragging reports to the dashboard, adding optional descriptions, images, text, and controls, and configuring display options.

To open the dashboard design centre:
1. Click the Analytics button on the navigation pane.
2. Double-click Reports Explorer.
3. Click the New Dashboard button to create a dashboard.

The following image shows the dashboard design centre.

img6

You can also add tabs to the dashboard to place additional reports and other content that may not fit on the dashboard’s main page. Each dashboard can have a maximum of 50 items placed on it.

If you add private reports to a dashboard, other staff members can view the reports when they open the dashboard.

Dashboard options allow you to select the time zone that should be used for the reports in the dashboard, change the dashboard owner, and modify settings that impact how the dashboard functions when it is opened for viewing. You can also configure automatic refresh of the data shown in the dashboard’s reports, select data source options, add notes to the dashboard, change the image displayed for the dashboard in report lists, and schedule the dashboard to be sent in an email.

You open dashboards just as you would open a regular report from the Reports explorer or one of your navigation lists. Dashboards can also be opened from links you add to reports. When you open a dashboard, it loads with current report data. You can also queue dashboards to view them at a later time.

The dashboard includes options similar to those accessed from the Report tab when viewing a report. The dashboard also includes docked filters that are common to the reports in the dashboard and may include tabs to access reports on other dashboard pages.

Since every report in a dashboard is fully functional, you can access the standard options available when viewing a report to sort columns, show or hide columns, and add column calculations. If the report and the permissions allow it, you can also access records listed in the reports or edit them inline.

When you open a dashboard, the dashboard’s ribbon includes Home and Page Setup tabs. You can use the options on these tabs to print the dashboard and adjust the dashboard’s display and output. When you select an individual report on the dashboard, the ribbon is updated to include additional tabs containing options for modifying the selected report.

The buttons available on the Home and Page Setup dashboard tabs let you open the Search window, refresh the display, select display options, forward the dashboard, configure print options, and perform other actions that impact the entire dashboard.

Dashboards can be queued to run at a later time just as reports can. Dashboards can be manually queued or automatically queued. Once a queued dashboard generates, you can view the dashboard using a standard report or a notification just as you can with queued reports. You can queue dashboards containing reports that you think may query or return large amounts of data. This is also helpful if you want to view a number of dashboards but do not want to wait for each to generate.

After you queue a dashboard, you can use standard reports located in the Reports explorer’s Public Reports > Common > Site Administration > Reports folder to see the dashboard’s status in the queue. Once the dashboard runs and is ready to view, you are notified and you can open it from several locations.

Analytics: Introduction to Analytics Explorers

The reporting features in RightNow CX are accessed through the RightNow Analytics explorers. From these explorers, you can create custom reports and dashboards, view standard and custom reports, and edit report styles, chart styles, colour schemes, images, and text fields to use with reports and dashboards.

Reports Explorer
Reports are contained in folders in the Reports explorer. These folders are in a tree structure and can be expanded or collapsed to hide or display their contents. Reports that are accessible by multiple staff members are contained in the Public Reports folder, and private reports that are accessible only to the staff member who created them are stored in the My Reports folder.

img1

Styles Explorer
Report styles allow you to quickly apply custom display settings to your reports without editing the underlying report. Styles can also help staff members use the same display settings for their reports so that all reports generated by your staff share the same appearance. You can easily create and edit styles to define the specific fonts, colours, borders, and margins which are most appropriate for your target audience.

You can edit style options for various components used in reports, such as text fields, column headers, exceptions descriptions, or entire report sections. You can also associate a custom chart style with your report style that will be applied to charts added to reports.

img2

Chart Styles Explorer
RightNow CX lets you create chart styles to define the appearance of charts shown on reports. By applying a chart style, you can immediately change a chart’s fonts, colours, scales, grid-lines  backgrounds, and other display attributes. The Chart Styles explorer includes several predefined chart styles, which you can apply to charts, and allows you to create custom chart styles. You can then apply the same chart style to charts in different reports to ensure that all the charts have a similar appearance.

img3

Images Explorer
Photos and other images can be uploaded to use in reports and dashboards. For example, your organization’s logo can be added as an image and then added to custom reports.

The images used with reports and dashboards can be added and replaced using the Images explorer. The ability to replace images is helpful when an image, such as a corporate logo, is modified. Once the image file is replaced, the reports and dashboards with the old image automatically use the new image.

img4

Text Fields Explorer
The Text Fields explorer lets you create text fields you can add to custom reports and dashboards. When you create a text field, you can specify the field’s text, fonts, borders, colours, and margins. You can also adjust these settings after you add the field to a report or dashboard.

For example, you could create a text field with your organization’s name, using your organization’s preferred fonts and colours, which you could add to your reports’ titles. Since the text fields can be edited once they are added to reports, you can also create a template text field with your customized settings and change the wording in the field as necessary.

img5

Cloud Monitor: Responding through social channels

Using the cloud monitor, you can add social media posts from Facebook, Twitter, and RightNow Community to new or existing incidents so they can be processed on the agent desktop.

You cannot respond to RSS feeds or YouTube posts through RightNow CX. However, you can create incidents from them, which can be helpful for other business purposes.

When you create an incident from a social channel, the content of the post is added as a customer thread entry. By default, the incident’s subject field will contain the name of the channel and the leading text of the post. Together exceeding no more than 240 characters. However, you can customize the subject field contents by editing the CLOUD_INC_SUBJECT_TEXT setting.

The method used to associate incoming social incidents with contacts varies by channel. Incidents created from a post in RightNow Community are associated with contacts based on contact email address. Incidents created from Facebook, Twitter, and YouTube posts are associated with a contact based on social media user name. If no matching contact is found, a new contact record is created and associated with the incident. Incidents created from RSS Feed or YouTube will be associated with a common generic contact.

The way you respond to social incidents also varies by channel. RightNow CX tracks each incident’s originating channel in the incidents.channel_id field and selects the same channel by default when you send a response. Each response is posted back to the contact using the unique messaging conventions of the originating media service.

Responding to Facebook posts
In Facebook, social conversations take the form of posts and comments on pages. While the cloud monitor allows you to monitor (but not respond to) posts from the public Facebook feed, you can respond to incidents created from customer posts on your organization’s Facebook fan page.

When you respond to a post on your organization’s Facebook page, the response appears as a comment beneath the post. The post is attributed to the name of the Facebook page designated by the channel account, rather than the agent’s name.

To respond to a Facebook post:
1. Perform a cloud search on a custom Facebook channel and view your search results
2. From the open cloud search report, select the post you want to create an incident from in the search results list.
3. Click the Respond button on the ribbon. A new incident opens on the content pane containing the details of the post
4. Select the Send On Save check box. The incident thread expands to reveal Facebook channel response options. The thread displays the name of the post’s originating channel and automatically selects the same channel for the response. The default channel account associated with the responding agent is also displayed
5. If your site has more than one Facebook channel account, click the Respond As dropdown menu in the header of the response thread.
6. Fill in any remaining details for the incident.
7. Click the Save and Close button on the ribbon.

Responding to Twitter posts
RightNow CX can create incidents automatically from private Twitter messages when you select the Automatically Create Incident option in the Twitter channel accounts editor.

To respond to a Twitter post:
1. Perform a cloud search on a Twitter channel and view your search results.
2. From the open cloud search report, select the post you want to create an incident from in the search results list.
3. Click the Respond button on the ribbon. A new incident opens on the content pane containing the details of the post
4. Select the Send on Save check box. The response thread header expands to reveal Twitter channel response options.
5. If your site has more than one Twitter channel account, click the Respond As drop-down menu and select the account you want to respond from.

Important: The channel account you respond from must include Private Message Response permissions. If the customer’s Twitter account is following your organization’s Twitter account, the Send Private check box will be visible and selected by default. You can clear this check box to post the message to the public feed. If the customer’s account is not following your organization’s account, the Send Private check box will not be shown and all sent messages will be public.

6. If your organization’s Twitter account is not yet following your customer’s Twitter account, click the Follow button.
7. Type your response in the response thread. Remember to limit each response to 140 characters, the maximum number allowed by Twitter.
8. Fill in any remaining details for the incident.
9. Click the Save and Close button on the ribbon to send the response through Twitter.

Cloud Monitor: Monitoring social channels

Monitoring social channels consists of searching the social cloud to track your organization’s reputation for the products or services it offers. You can manage your favourite cloud searches and subscriptions, schedule cloud searches, ignore or respond to posts, and create incidents from posts. You can also append posts to existing incidents as note thread entries.

By default, cloud search results that are not responded to, ignored, or added to an incident within 7 days are automatically deleted from the system. To change this frequency, modify the setting in configuration settings: PURGE_CLOUD_RESULTS.

The first step to monitoring the social cloud is to add cloud searches so you can search for posts mentioning your organization, products, services, or anything else related to your organization that you are interested in. You can also add subscriptions to monitor all content from an entire Facebook page or RSS feed.

To add a cloud search:
1. Click the Cloud Monitor button on the navigation pane.
2. Double-click Cloud Monitor in the navigation list.
3. Click Add button in the ribbon. The Add Cloud Monitor window will open.
4. Click Add New Cloud Search button and choose the channel from the drop down list.
5. Enter the word you want to search for on the Search Text field.
6. Enter the language preferred on the Language field (e.g. for English enter EN).

cm10

cm11

The search will be displayed on the Favourites report on the content pane, where the agent can drilldown on New Results or Total Results to see the detail. The Cloud Monitor by Search report opens and from there agents can respond or ignore posts as well as create incidents from posts or append them to an existent incident.

cm12

cm14

Once an incident has been created for a post, it can be assigned to a staff member from the cloud search report by selecting the post and clicking the Assign button on the ribbon.

In addition to posting public messages, agents can view and respond to private messages received by the organization’s Twitter account. Once you have enabled private message permissions in a Twitter channel account the Dbstatus utility automatically checks for private messages every 15 minutes and displays them on the cloud monitor.

Private message search results function like other cloud search results – you can create incidents from them, append them to existing incidents, mark them read, or ignore them. You can configure each Twitter channel account to automatically create incidents from all private messages it receives.

cm16

Scheduling cloud searches can save you time and help ensure that you consistently monitor the social cloud. For instance, you could set up a schedule to search once a week on a specific day or schedule a one-time search to coincide with a product release or important organizational announcement. A search cannot be scheduled unless it is marked as a favourite. To schedule a cloud search click the Edit Schedule button on the ribbon. The Cloud Scheduling window opens, where the agent can configure the schedule times.

cm15

Cloud Monitor: Configuration and Overview

Configuration
Before you can monitor the social cloud to search for information related to your organization, you need to configure your application to provide access to the RightNow Cloud Monitor.

To provide access to the RightNow Cloud Monitor it is necessary to:

  • Add cloud monitor to Navigation Sets
  • Add cloud monitor permission to Profiles

cm6

cm7

Overview
Using the cloud monitor, you can add, execute, and analyse cloud searches for any of the available social channels. As each new cloud search is added, it is listed on the content pane along with information about who added it, what social channel is searched, what text is searched for, the time it was last executed, and how many results have been returned. A search can also be designated as a favourite, which prevents it from being deleted and enables it to be scheduled on a recurring basis.

Twitter, Facebook, RightNow Community, and RSS searches can return a maximum of 100 new results per search instance, while YouTube searches are limited to 50 new results.

The social channels available for cloud searches are configured through the Channels editor. In addition, the Channels editor provides a utility for viewing and managing cloud searches that have been added for each channel. With the Cloud Search Manager, you can view and manage the list of agents who have selected each search as a favourite as well as remove searches that were entered incorrectly or are no longer needed.

The Cloud Monitor dashboard is divided into 3 sections.

  • Favourites: Contains a list of previous cloud searches. Each time you perform a new cloud search, it is automatically marked as a favourite and added to this section.
  • Subscriptions: Contains a list of cloud searches that have been added on a subscription basis. Refer to Searching the social cloud.
  • Private Messages: Contains messages received through Twitter private messages. Refer to Responding to Twitter posts.

cm8

Cloud Monitor: Twitter Channel

Cloud Monitor allows your company to monitor and participate in conversations on the Social Networks, interacting with the customers through Facebook, Twitter and listening on YouTube, Blogs or other RSS Feeds. From the searches in the Cloud Monitor agents can create incidents to pro-actively communicate with customers and follow up customers’ issues and also identify trends or experiences.

Social Channels have to be set up in order for RightNow to be able to search the Social Networks for posts and comments related to your organization and its products/services. These channels include Facebook, Twitter, YouTube, and RSS feeds.

Twitter
RightNow CX provides a default Twitter channel that you can access through the cloud monitor to perform searches of Twitter’s public feed. In order to monitor the public feed, you must first create a Twitter channel account and then select it from the Twitter channel editor.

Channel accounts enable agents to monitor, automatically create incidents, and send responses publicly or privately from the RightNow Agent desktop to public tweets or private messages sent to your organization’s Twitter account.

To add a channel account for Twitter:
1. Click the Configuration button on the navigation pane.
2. Double-click Channel Accounts under Service. The Channel Accounts tree displays.
3. Click Twitter and then click the New button on the ribbon to display the editor.
4. Type a name for the Twitter channel account in field Name.
5. Define how private messages will be processed in Private Message Permissions.
6. Select a group check box to associate all staff members in the group with the channel account or expand the group to select staff members individually.
7. Click the Grant Access button on the Channel Accounts editor. The Twitter Login window displays.
8. Type the user name and password of the Twitter account.
9. Click the Authorize App button. A message informs you that you have been granted access.
10. Click the OK button.
11. Click the Save and Close button on the ribbon.

cm4

To enable the public Twitter channel for social monitoring.
1. Click the Configuration button on the navigation pane.
2. Double-click Channels under Service in the configuration list. The Channels tree displays.
3. Click the Twitter down arrow and then select the Twitter channel to display the editor.
4. Type a name for the channel in field Name.
5. Click the drop-down menu to select the channel account you want to use to authenticate cloud searches.
6. Click the Save and Close button on the ribbon.

cm5

Note: Once the channel is saved and has been used to perform cloud searches, the Search Manager button on the Channels editor ribbon will become active. This function provides access to a utility for managing cloud searches by channel.

cm3